
How to Choose the Best Development Kit: The Ultimate Guide for Beginners
If you’re looking to build a proof-of-concept (POC) prototype for a new product idea, your first step is to choose a development kit. It’s actually more complicated than you may imagine, but I’ll explain why.

So you’re ready to build a proof-of-concept prototype for your consumer product idea, or perhaps you’re just wanting to learn more about electronics development. How do you pick the right development kit (also called a development board)?
A development kit will serve as the brains of your project and will communicate with all the interconnected electronic components.
But here’s the thing about choosing development kits — it’s a super-complex decision, with lots of technical attributes that don’t seem to make a lot of sense, especially if you’re just getting started with electronics.
For example, consider the technical comparison of Arduino boards from their official website:Arduino Board Comparison
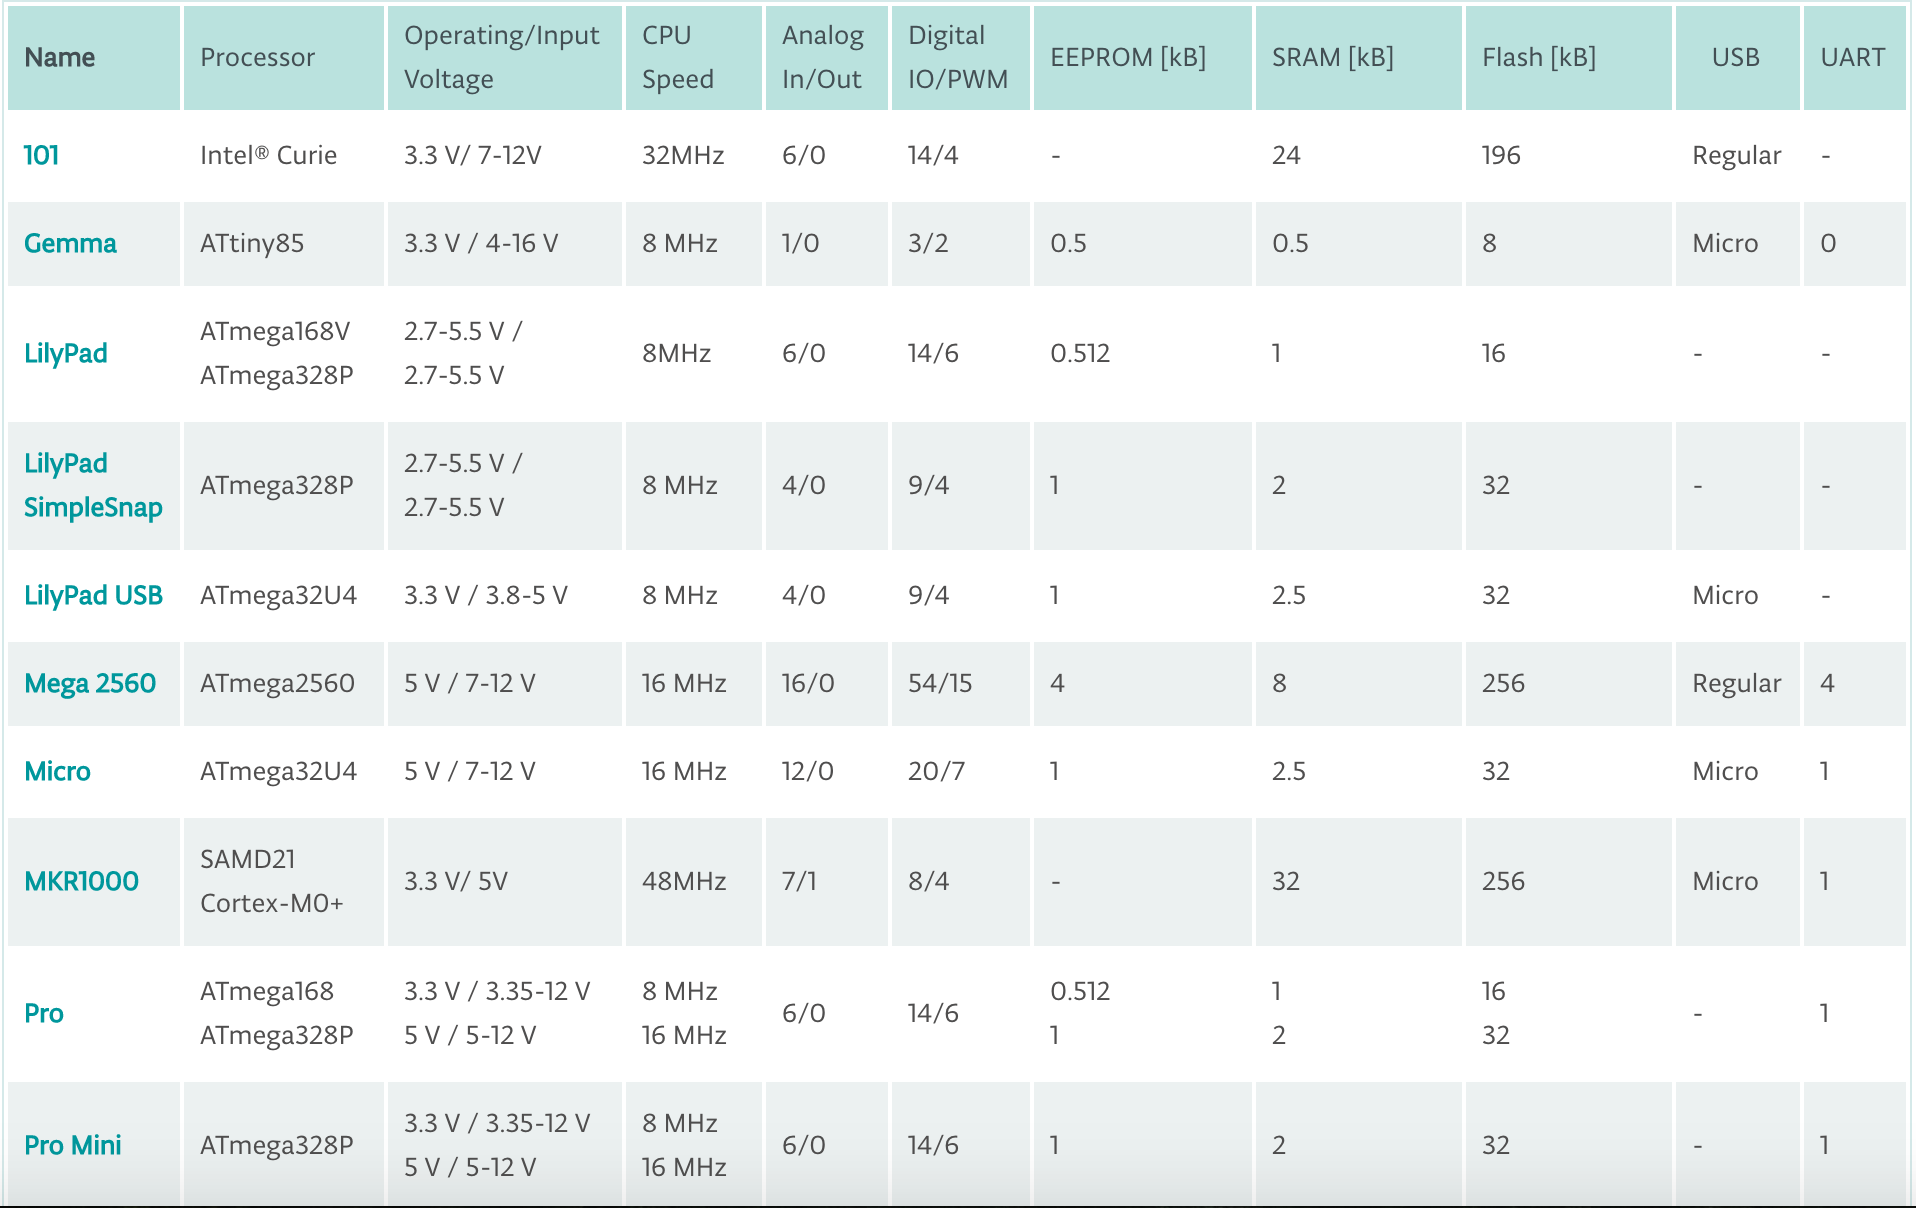
While the chart is meticulously labelled for a direct one-to-one comparison, it’s a little too intricate for beginners to understand.
For instance, which parameters matter the most for your project? Do you need to pick a board with the highest RAM and FLASH memory size? Or do you need to pick a board with a higher clock speed to improve the speed of execution?
While a lot of guides offer extensive technical guidance in choosing between different variants (Arduino, Raspberry Pi, BeagleBone), there aren’t many guides that explain the decisive factors that you need to consider while choosing a development board.
In this article, we’re going to dive into the basics of development boards, explore the optimal variants for different applications, and understand decisive pointers that play a pivotal role in selecting the right board for an array of applications.
What is a development kit?
Development kits can be broadly split into two types: kits based on a microcontroller unit (MCU) and kits based on a microprocessor unit (MPU).
Both a microcontroller and a microprocessor are just two types of a computer chip. A MCU is slower, more integrated, easier to program, easier to design, requires no operating system, consumes less power, and costs less than an MPU.
An MPU on the other hand is much faster and more complex to program and to design. Their higher performance capabilities also require far more power. They also use a full operating system such as Linux or Android.
Think of a microcontroller as the brains behind products such as wearable tech, remote controls, drones, or microwaves. A microprocessor, on the other hand, serves as the brains behind products like computers and smart phones.
In fact, if you connect a keyboard and display to a microprocessor development kit, such as the Raspberry Pi, you can use it as a stand-alone computer allowing you to do things like surf the web.
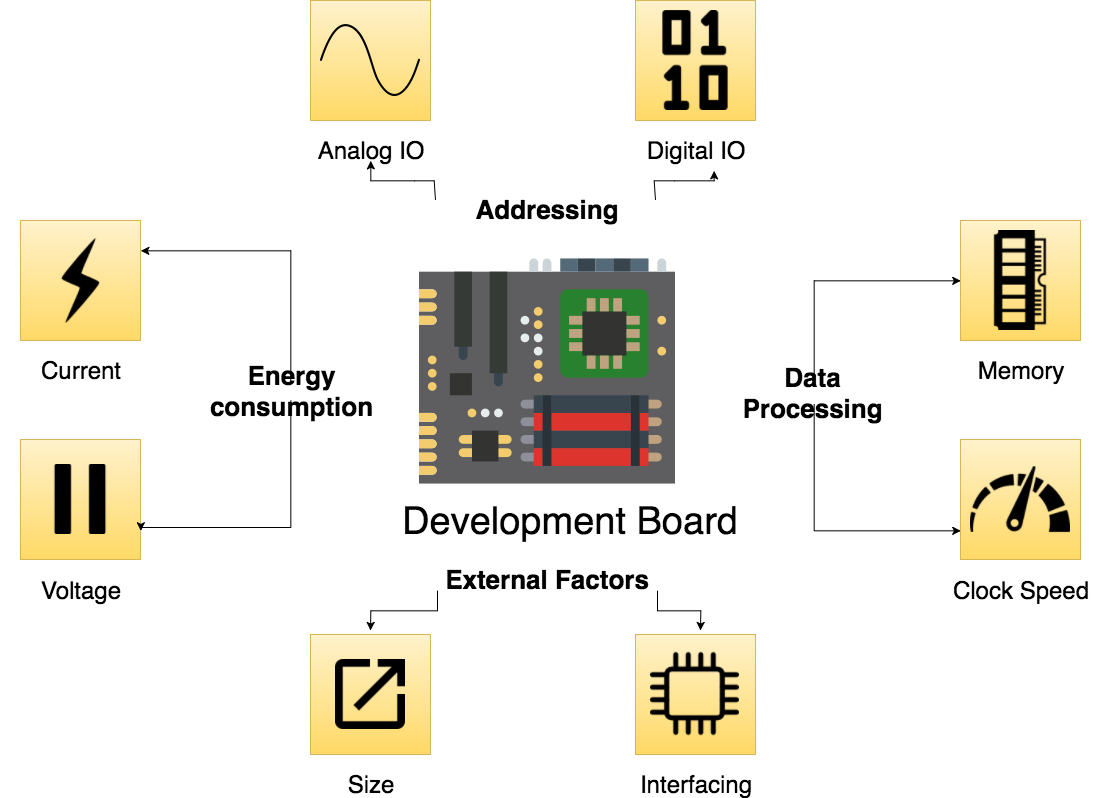
Your brain can take inputs from the environment (vision, smell, touch, etc.), process the information (react to input signals), and trigger a reaction.
Similarly, a MCU/MPU can sense multiple input signals (analog or digital), process the information (based on preprogrammed logic) and provide corresponding output signals.
A microcontroller contains a core processor, some memory, at least one serial interface for communicating with external peripherals, and general purpose input/output (GPIO) pins all integrated onto a single chip.
Microcontrollers are primarily used to control processes and manage input/output signals from externally connected components, like sensors, wireless radios (such as Bluetooth), actuators, motors, electronic displays, etc.
As examples, Arduinos are microcontroller kits and the Raspberry Pi is a microprocessor kit.
But, microcontrollers and microprocessors aren’t a new concept, and have been around for decades.
Why is it that development boards like Arduino, Raspberry Pi or BeagleBone have managed to get such wide-spread acceptance and popularity with makers and hardware entrepreneurs?
Well, the answer is they are reusable, easy to use, affordable and familiar.
In the past, microcontrollers were programmed using proprietary serial communication interfaces, proprietary software, and required special equipment for each brand of microcontroller.
But with the advent of open source microcontroller development kits like Arduino, it became possible to program microcontrollers through a USB interface from any computer.
The shift from low-level hardware programming (assembly language) to high level programming (C/C++/Python) using a standardized communication interface was a major inflection point in the electronics industry.
The cost-effectiveness of open-source development boards, coupled with ease-of-use and convenience, helped to trigger the maker movement across the globe.
More than 12.5 million Raspberry Pi boards have been sold in the last five years, with the maker community growing multifold in the last decade.
While it used to take weeks or months to build a working prototype of a drone, 3D printer or self-balancing robot, you can now build the first version in just a few days using an Arduino or Raspberry Pi.
However, as more functional prototypes were developed, the maker community soon realized that it was impossible to have a generic, ‘one-size-fits-all’ development kit.
For example, while Raspberry Pi is a super-powerful microprocessor development board, it’s not ideal for controlling a setup with 10 analog inputs and 25 digital outputs, because the Pi has limited GPIOs (I/O bus) available for external use.
Nor is a Raspberry Pi or BeagleBone a good choice for prototyping most ultra-low power wearable tech products. The power consumption is just too high. A Raspberry Pi consumes hundreds of milliamps of current, whereas an Arduino only consumes tens of milliamps.
Therefore, with the view of democratizing the prototyping platform for a variety of different use-cases, multiple models with slightly different technical specifications were introduced.
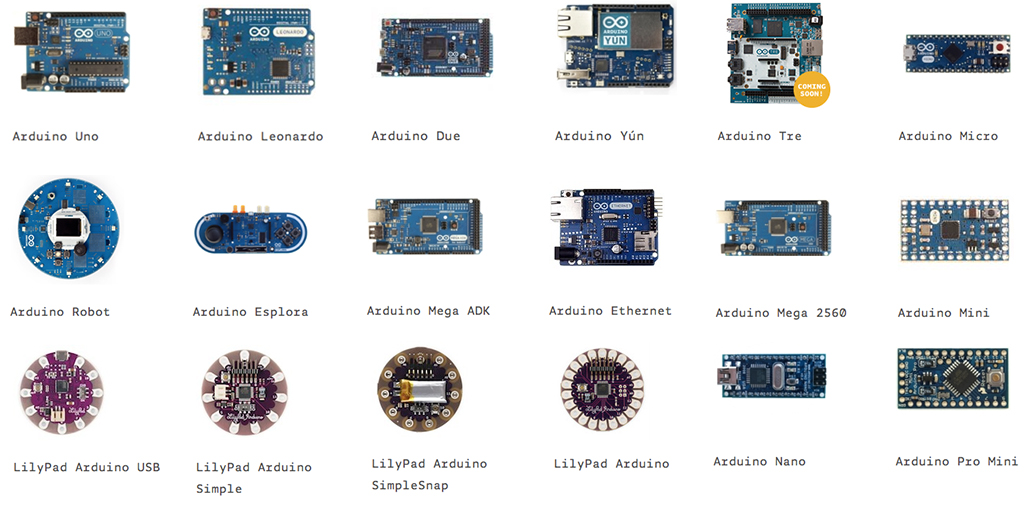
For instance, there are multiple models of Arduino, like, Uno, Nano, Mini, Pro, Leonardo, etc.. to suit different project specifications.
We will discuss this in detail in the next section of the article, but for now, it’s important to understand why multiple models of development kits exist, and how it’s impossible to have a single kit that can cater to all prototyping use-cases.
Note: A lot of people think that if they buy a development board with the most powerful technical specs, they will be able to build a working prototype for all possible use-cases. But that’s simply not true.
There are no short-cuts, here. You have to analyze what kind of project you’re looking to build, and pick a kit that best suits those needs.
The most popular development kits
Arduino
The Arduino family of microcontroller development kits is an ideal choice when you want to communicate with a wide array of electronic components and manage the intercommunication on a swift, robust basis.
Examples include robotic cars, control circuits, data logging units, etc.
Arduino has a pretty diverse line up of microcontrollers, ranging from the extremely tiny (Arduino Micro) to the amazingly powerful (Arduino Due).
Unlike Raspberry Pi, Arduino boards don’t run an operating system, and come with limited RAM/Flash storage (usually in kilobytes).
While the space might seem a bit constrained, it’s usually enough to write a piece of code that can run your project.
The best part is that Arduino boards are incredibly cheap, with models like Uno costing around $20. However, if you’re like me and believe in building things from scratch, you can even build your own Arduino on a breadboard by following this tutorial.
Unique factor: Arduino is a robust, flexible and affordable development platform, supported extensively by a growing online community. Since it’s used by millions of enthusiasts worldwide, it’s very likely that you’ll find source-code for your use-case online, and you’ll just need to tweak it a bit to suit your requirements.
Suited for: Beginners, who are looking to build their first electronics project
Recommended model (starter): Arduino Uno
Supported Programming Languages: C/C++
Choose Arduino Uno as your development board if you want:
– A development board that’s simple, affordable and easy-to-use
– Control of a handful of input-output devices (analog/digital), and want a system that efficiently manages the intercommunication.
– To create a project that isn’t connected to the Internet, and operates independently on a standalone basis.
– A development kit without the extra overhead of an operating system.
The Raspberry Pi
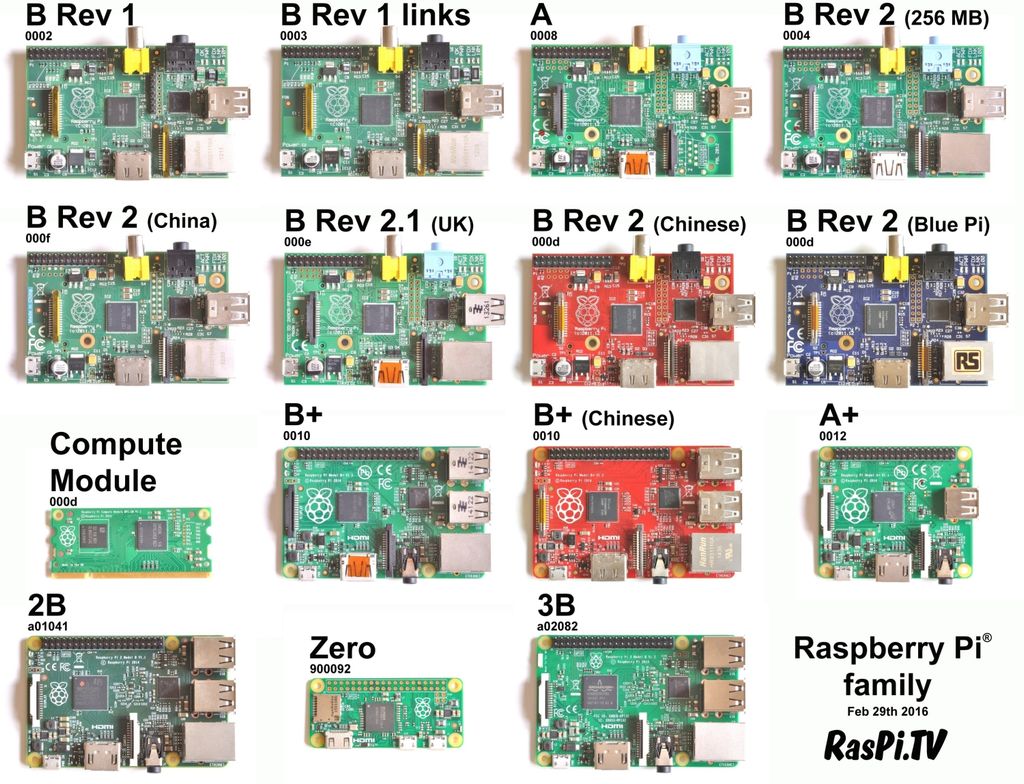
Raspberry Pi remains one of the most popular development kits in the maker community. It truly is a complete, stand-alone computer on a relatively small board.
Priced at just $35, the latest version features a 1.2 GHz quad core processor with 1GB RAM and expandable flash memory.
To further sweeten the deal, the latest version—Raspberry Pi Model 3—comes with built-in HDMI, Wi-Fi and Bluetooth capabilities, making it one of the best development boards for creative experimentation.
Unique factor: Raspberry Pi is capable of running an entire operating system on top of it (Linux, Raspbian, Windows or even Android), making it an ideal choice for applications where you need extra-powerful computing, or want to integrate multiple web-based services.
Suited for: Enthusiasts who are building a project that requires significant computational power, and that have a background in computer programming.
Recommended model (starter): Raspberry Pi Model 3
Supported Programming Languages: Python, C/C++, Java, Perl, Ruby
Choose Raspberry Pi as your development board if you want to:
– Build a project that requires a fair bit of computational power
– Plug your project to an external display via HDMI interface
– Perform HD video capture and processing
– Implement speech recognition capabilities
BeagleBone
BeagleBone is another popular microprocessor development board that’s mainly used for prototyping advanced applications like gesture recognition, face detection or even underwater exploration.
Powered by an ARM Cortex A8 1 GHz processor and 512 MB DDR3 RAM, it can easily handle complex data processing while drawing incredibly low power.
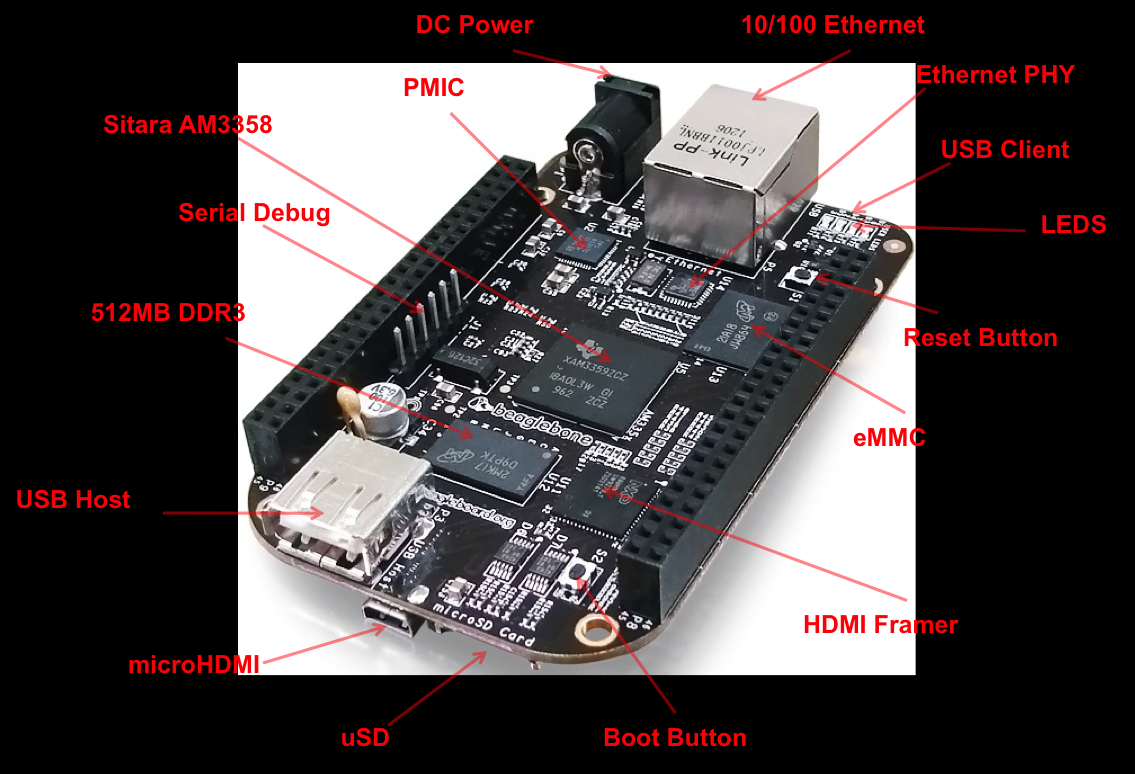
Compared to Raspberry Pi, BeagleBone offers nearly 1.5 times more GPIO pins (65 digital pins), and comes with 4GB onboard storage memory (no SD card required!).
Unique factor: BeagleBone is an open-hardware, open-software computer which supports operating systems like, Ubuntu, Android (official) and Linux. It offers much more interfacing capabilities than Raspberry Pi.
Recommended model (starter): BeagleBone Black Wireless
Ideal for: Those who are looking to build an advanced prototype
Supported Programming Languages: Python, C/C++, Java, Perl, Ruby
Choose BeagleBone Black as your development board if you’re:
– Looking for a high performance and affordable development board
– Want to run the project on operating systems like, Linux, Ubuntu or Android
– Connecting a lot of input/output peripherals (65 digital pins)
How do you choose a development board?
In the previous section, we looked at some of the most popular development platforms available on the market. But how do you know which one is right for your project?
In this section, I will do a quick rundown of all the decisive factors (hardware + software) that play a crucial role in assessing the resourcefulness of a development board.
Once you have a solid grasp of these factors, you’ll be able to assess in just a few seconds, if a development board is a good fit for your project (no kidding!).
Hardware
Voltage: The first factor that you need to consider, when choosing a development kit is voltage. Every development will have two types of voltages mentioned in the technical specification: Input Voltage and Operating Voltage.
Input Voltage = The voltage provided to the kit via an external power source (usually a wall adapter).
Operating Voltage = The regulated voltage supply that the board provides for externally connected devices.
While input voltage varies (7-20V) depending on each kit, the operating voltage will generally be fixed at 3.3V or 5V.
This means that if you pick a development board with 5V operating voltage, you’ll ideally want to pick external components that all operate on 5 volts.
If you pick a sensor/display that operates on a slightly different voltage, you may need to use a voltage divider or bidirectional level shifter to successfully control it through your development board.
Warning: If you connect a 5V sensor with a 3.3V voltage, the sensor might not activate, but it won’t necessarily get damaged. However, if you connect a 3.3V sensor with 5V voltage, it’s quite likely that it will be damaged. Therefore, it’s important to ensure that you connect devices at the correct operating voltage.
Current: Think of voltage as an overhead water tank and current as the flow of water through the pipes. While the flow of current would naturally increase if the height of water tank is increased, you can also regulate the water supply by having thin, narrow pipes and appropriate valves.
Similarly, every development board has an internal impedance that regulates the amount of current that can flow through it. The limit is usually imposed to preserve the circuitry, and to provide appropriate interfacing with external devices.
If you look at the technical specification of every board, you’ll find a section that reads: DC current per I/O pin. This refers to how much current is available to externally connected electrical components, if they’re connected to the development board.
If the sensor or display that you’re connecting needs a different current to operate, you might want to regulate the supplied current before connecting the pins directly.
Note: If you’re powering up multiple electronic components through the operating voltage (Vcc) on the development board, the setup might draw more current than the threshold value.
Therefore, using an external power supply (3.3V/5V) for supplying operating voltage is always recommended, especially if you’re connecting lots of components to the development board.
Clock-speed: In quite simple terms, clock-speed is the rate at which the development boards process data.
For instance, Arduino Uno has a clock speed of 16 MHz, while Due has a clock speed of 84 MHz. That means Due would be able to perform almost 5x better than Uno in time-sensitive or data-intensive applications.
Processor performance is dependent on much more than just a clock speed, so this only holds true as an approximate way to measure performance differences among similar processors.
That being said, processors with higher clock speeds consume comparatively more power, which means if you’re running the setup on a battery, Arduino Uno would run for a longer duration than an Arduino Due.
Generally, clock speed isn’t a huge concern, unless your project is highly complex or time-critical. However, if you’re planning to run the setup on battery, it’s highly recommended to aim for microcontrollers that have lower clock speeds.
GPIO: To provide more flexibility for designing electronic projects, development boards come with GPIO (General Purpose Input/Output) pins.
The advantage of using these pins for external communication is that the behavior of each pin can be defined at run-time by the processor. For instance, you can write the following code snippet to use GPIO pin 7 as an input pin on an Arduino:
void setup() {
pinMode(7, INPUT); // sets the digital pin 7 as input
}
But, if you want to change the configuration later on, you can also configure the same pin as an output pin with the following modifications:
void setup() {
pinMode(7, OUTPUT); // sets the digital pin 7 as output
}
Before you choose a development board, it’s important to pre-assess how many GPIO pins you’d need to manage the intercommunication between the components.
The easiest way to determine how many GPIO pins you’ll need for the project is to first pre-design your project by creating a detailed block diagram.
But even if you figure out the total GPIO pins, the mapping won’t be that simple. Since GPIO pins are further categorized into analog and digital pins, you’ll need to assess whether you have the correct number of analog/digital pins available for the project.
Analog/Digital pins: GPIO pins are digital and can be either HIGH or LOW, but nothing in between those states. Any signal above 66% of the operating voltage is considered HIGH, while below that is considered a LOW signal.
For example, push-buttons or relays can be connected to digital I/O pins.
But there are cases when you need more than just HIGH or LOW signaling. For instance, you might want to control the motor speed or dim the light to desired levels.
For these applications you can use digital pins that are marked as PWM (Pulse-Width Modulation). These pins can toggle between HIGH and LOW at a programmable duty cycle.
Duty cycle refers to what percentage of the time the pin is HIGH versus LOW. This allows you to control the average voltage and thus provide some form of analog output.
Lastly, there are analog input/output (AIO) pins which are capable of reading analog voltage signals (using a built-in Analog-to-Digital Converter, or ADC) and also outputting true analog voltages (using a Digital-to-Analog Converter circuit called a DAC).
These pins can be useful in scenarios, where you need to measure a voltage, instead of sensing just HIGH or LOW logic states.
For instance, the TMP36 temperature sensor sends out a varying voltage value on an analog pin, which is then converted by the processor into a temperature value with a simple mathematical calculation.
You need to analyze how many digital, PWM and analog pins you need in your project in order to accurately assess which development board is right for your project.
Size: Many prototypes need to fit into certain dimensions, so you need to consider size when selecting a development board.
If your project has tight space constraints it’s much better to pick an Arduino Micro or Mini, rather than an Uno, since they are much smaller.
Software
Scripting language: While development boards like Raspberry Pi, BeagleBone, etc. support multiple programming languages, tools and environments, you won’t get that type of flexibility when writing programs on Arduino.
However, if you’re a beginner and want to learn embedded programming, Arduino boards may be a better choice.
Memory limit: Development kits like Arduino come with limited RAM or FLASH memory, which means you need to assess the complexity of your project before choosing any kit.
That being said, Raspberry Pi or BeagleBone should have enough RAM or FLASH memory to handle projects of any given complexity.
Operating System (OS): If you’re looking to run the setup on an OS like Android or Ubuntu, it’s always good to cross-check the official compatibility of different operating systems with the kit.
For instance, the Raspberry Pi doesn’t have official Android support, while BeagleBone allows you to write code in an Android environment.
Mapping use-cases with development kits
So far, we have looked at all the decisive factors for choosing the best development board. But what about if you are starting with the “end-in-mind”.
For instance, you might be building a wearable tech device. In this scenario, which development board would be the best choice?
In the next section, I’ve grouped the development kits directly with popular project use-cases. This makes it easier for you to get started using developer kits, instead of spending time analyzing technical applications.
Low-battery applications: Arduino Nano, Arduino Pro or Arduino Micro
Best choice: Arduino Micro comes without the FTDI USB-to-serial chip, thereby consuming the least amount of power. However, Pro and Micro might be a better choice for building prototypes, as they can be reprogrammed more easily.
Wearables: Arduino Gemma, Arduino Lilypad or ArduinoFlora
Best choice: Flora is the most advanced wearable microcontroller kit available in the market, as it has 2x the FLASH and SRAM compared to Lilypad. It’s also a quarter-inch smaller in diameter.
Data-logging: Arduino Uno, Arduino Mega, Arduino Leonardo, and Arduino Due
Best choice: There’s no best kit for this use-case, since the choice depends on the specific project that you’re looking to build. However, Arduino Due is one of the most advanced microcontroller kits on the market, while Uno remains a cost-effective option for data-logging projects.
IoT/network applications: NodeMCU, Raspberry Pi, Arduino Yun, Arduino Tian, BeagleBone
Best choice: NodeMCU is the cheapest way to build an IoT device. If you want something more sophisticated, look at BeagleBone or Tian.
Summary of the steps for choosing a development board
I’ve summed everything up into 7 steps. Follow each step to choose the best development kit for your project:
Step #1: Understand the application
Specify all the components that will be required for building the project, apart from the processor.
Step #2: Analyze the externally connected components
Once you have figured out all the components, draw a block diagram. Make a note of all the I/O pins that will be needed. This includes digital GPIO pins, analog IO pins, and serial interfaces such as I2C, SPI, and UART.
Step #3: Decide the operating voltage/current
Decide on the operating voltage/current of the entire circuitry. If there are sensors on different logic levels (3.3V/5V), use a bidirectional level shifter or voltage divider to convert the operating voltage.
Step #4: Figure out the connectivity stack
Look at the connectivity options that you’ll need. While you can connect multiple external modules, like Wi-Fi or Bluetooth, it’s always better to choose a board that has these capabilities already built-in.
Step #5: Consider the size and dimensions
What are the size limitations on your product? Confirm that the development board fits inside the project.
Step #6: Calculate the power drain (optional)
For battery-sensitive prototypes, make sure to calculate the power drain of the entire project to get an assessment of how long the setup will run on the battery.
Step #7: Map the GPIOs
In the last step, calculate how many I/O pins you need, and split them into digital, analog or PWM pins. Pick a board that offers enough GPIO pins for interfacing.
Conclusion
Development kits are the best way to learn electronics and to develop a Proof-of-Concept (POC) prototype.
There are many options for development kits which can be overwhelming. However, once you decide whether your project needs a microcontroller or a microprocessor the choices become more simple.
There are many other development kits available that we’ve not discussed, but this article has covered all of the most popular kits. You will find an incredible amount of information and a vibrant community for the kits discussed in this article making them ideal for beginners.
If your primary goal is to create a POC prototype, and not just to learn about electronics, then you may want to consider other development kits based on more powerful microcontrollers.
For example, I highly recommend looking at development kits from ST Microelectronics which are based on their STM32 line of 32-bit ARM Cortex-M microcontrollers. For products that will be manufactured and sold in volume, the STM32 line of microcontrollers is my favorite choice.
—–
Written by Abhi Bavishi who is the Founder of Smartify, India’s leading smart home marketplace. He’s passionate about IoT (Internet-of-Things), and loves building DIY electronic projects. While he’s not helping people build smart homes, you can find him scripting an AI bot, assembling a self-landing drone, or writing in-depth technical guides.
Other content you may like:
- How to Select the Best Electronic Development Board to Prototype Your New Product
- How to Choose the Right Arduino Board for Your Project
- Hardware Overview of the Arduino Nano 33 BLE Sense Development Board for Prototyping
- How to Port a Raspberry Pi Project to a Compute Module for Mass Production
- From an Arduino Mega Prototype to a Custom PCB

I was looking for dev board for hosting Hassio for my smart home.Thanks to you i have decided to proceed with Raspberry Pi 3. Once again thanks for writing such a detailed article. It was super helpful.
nyc article it will help people a lot as well as me when I start programming
Great article, it will really help a lot for me in smart home system
good article explain everything nicely and in full detail
very useful for beginner
Thank you for the info provided in your article. You answered 90% of my questions.
Kind Regards,
Fantastic, thanks for the feedback!
I have qustion related to the topic… Between time to time, microship announce new Development board, such as dsPIC33CH curiosity development board.
Does the topic apply to these kids of development board?
What is the job of Thses kid of board.
Thank you so much for all you topics. They improve my knowledge lots.
Bassam
Thank you so much for this Article, it’ll help me in future for a Smart Home Device and Smart Home Solutions!
Great info,Cleared all my queries.Thanks for the write-up
You are most welcome, glad it proved helpful!
Thank you , Each and every step explained in detail manner , really it was helpful.
I have a doubt about learning embedded programming, i am not expert into the programming & i wanted to be expert in each and every concepts of embedded programming. where i can start ? can i directly go to STM discovery boards or should i practice first on arduino ? . I don’t practice on arduino as it is open source and libraries are readymade .
Thanks for the comment and question. If you have no programming experience at all then an Arduino is likely the best place to start to learn embedded programming. But once you get the basics down I would transition to an STM Discovery board if developing a commercial product is your final goal.
Best wishes,
John
Nothing was mentioned about Microchip PICs. I would like to learn the best way to get started programming them.
Thanks
Amazing article, very informative .. infact cleared several questions n doubts.
Excellent to hear, thanks for the feedback!
Thank you very much, very informative and useful to me.
Glad it was useful for you! Thanks for the comment.