
How to Turn Your Raspberry Pi Into an Amazon Echo/Dot Using Alexa
In this article, I’m going to walk you through installing the Amazon Voice Service (Alexa) on your Raspberry Pi. Installing AVS on a Raspberry Pi will help you understand how Amazon’s intelligent voice assistant works, and how you can deploy it on pretty much any device.

When Amazon launched its flagship product the Amazon Echo in 2015, it was nothing more than a voice-controlled speaker. But in barely two years, the intelligent voice assistant had already conquered the consumer electronics market, and was found in 5 million homes.
Alexa’s dominance was evident by 2017, when concept designs from consumer brands like Ford, Whirlpool and LG had a built-in Alexa integration. Fast forward to 2021, when estimates show that one in four households have a smart speaker, with Amazon’s echo dot being the most popular device.
While the widespread popularity of the device can largely be attributed to its intuitive voice processing capabilities, the fact that Amazon opened up its platform to collaborators for developing voice apps accelerated the early adoption.
Let’s look at how you can install the Amazon Voice Service (Alexa) on your Raspberry Pi, which should teach you how Amazon’s intelligent voice assistant works in the background. Then, you should feel confident using it with any device imaginable.
Once you have a grip on the boilerplate code, you’ll also be able to use Alexa’s search capabilities to prototype a smart home device, develop an advanced skill set on the AVS platform, or create an interactive, voice-controlled electronic project.
However, since it’s a DIY setup, you won’t be able to build something that looks as cool as the Amazon Echo. For instance, see the image above showing what the homebrew version of my Amazon Echo looks like.
That being said, the above DIY setup is a fully functional Amazon Echo device that can respond to your voice commands and take contextual actions. For instance, you’ll be able to use your Raspberry Pi to check weather, stream your favorite music, or control connected devices in your home, like LIFX, Philips Hue or the Nest thermostat.
Here’s what you’ll need for the project:
-
- ►
Raspberry Pi 3 (If you’re using Raspberry Pi Model A or Zero, you’ll need an Ethernet cable or USB Wi-Fi adapter to connect to the Internet.)
-
- ►
Micro SD card with Raspbian installed
-
- ►
3.5 mm line-in speaker
-
- ►
PlayStation Eye Camera (Alternatively, you can even use an USB microphone.)
-
- ►
Micro USB cable (for powering Pi)
-
- ►
Keyboard, mouse and display (or you can even use VNC to connect to your Raspberry Pi from your Mac, Linux or Windows machine)
-
- ►
Power bank (optional)

I’ve used the PlayStation eye camera, as it provides better audio reception than most USB microphones under $10. But, in case you have a good quality USB microphone, you can use that, too.
Step 1: Setup your Raspberry Pi
Before we move ahead with the installation, it’s important to get your Raspberry Pi up and running. Here’s a checklist of the initial setup process:
Install Raspbian: In case you don’t have the latest version of Raspbian installed on your device, you can download the latest version, and then burn the downloaded image file on your SD card.
Connect peripherals: While I’m using a Bluetooth mouse and keyboard, you can also use USB peripherals for your convenience. Also, hook up your Pi with a HDMI display, so that you’re able to see the output.
Set up a VNC server (optional): In case you don’t have any peripherals or display device, you can even connect to your Raspberry Pi using VNC, so that you can access your Pi from any Linux, Mac or Windows machine. Here’s an easy guide on how to setup VNC on your Raspberry Pi.
Audio check: Connect the microphone and external speaker to your Raspberry Pi. Enable the speaker output by right-clicking on the speaker menu on the taskbar, and selecting “Analog”. You can configure the Pi to recognize the USB microphone as default by running the following command on the terminal:
Once you open up the editor window, navigate to the line that reads:
Change it to:
Press Ctrl + X to exit the editor and save the configurations.
Step 2: Configure your Amazon Developer Account
Once you have setup your Raspberry Pi, the next step is to configure your Amazon Developer Account, so that you can link your Raspberry Pi with Alexa Voice Service (AVS).
The developer account is a prerequisite for the setup, since Amazon provides Alexa “as a service”. All the complex tasks associated with voice processing, like, context binding, semantic analysis or deep learning happen on Amazon’s cloud servers, while the client (in our case Raspberry Pi) just needs to invoke the voice service (AVS) by passing along the input.
However, in order to communicate with AVS, we would need to get the authentication tokens, so that Amazon’s servers can recognize our client and send responses. Here’s how to setup the security profile and get the authentication tokens:
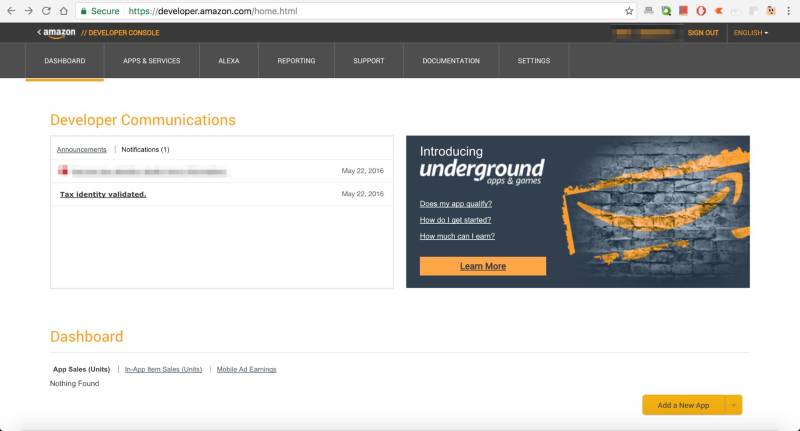
1) First, you’ll need to register for a free Amazon Developer account. Once you’re registered, you should be able to login and see a dashboard that looks something like this:
2) Once you’re on the dashboard, click on Alexa in the navigation menu. It’ll give you two choices– Alexa Skills Set or Alexa Voice Service. Select “Alexa Voice Service”.
3) Next, the screen will ask you to register your product with Alexa Voice Service. Click on “Register a Product Type” button. You’ll be prompted whether you wish to register a device or an application. Select “Device”.

4) Once you’re through that, you’ll be navigated to “Create a New Device Type” screen, where you’ll be asked to enter a Type ID and Name. Here, you are free to enter any name or value that you wish. Just for convenience, we choose to name our device “Raspberry Pi” and set the ID as “RPi”.

5) Next, you’ll be asked to create a security profile. In the dropdown box, select “Create a new profile”. The name of the security profile and description would be auto-populated. Click “Next”.

6) In the next screen, you’ll be able to see the authentication credentials for accessing AVS. Make a note of your Client ID and Client Secret key, as you’ll need them later.

7) After noting down the credentials, click on the “Web Settings” tab. Once you’re there, click on the “Edit” button on the top-right corner. It should allow you to modify the “Allowed Origins” and “Allowed Return URLs” for the security profile.

Click on “Add Another” to enable editing for Allowed Origins, and enter the following URL:
Similarly, set the Allowed Return URL to:
When you’re done, save the settings, and click on “Next”.
8) After you have configured your security profile, you’ll be asked to enter the device details. It really doesn’t matter what you enter here, so you can choose an image of your choice, pick any random category, write a relevant description and set an arbitrary timeline for the device.
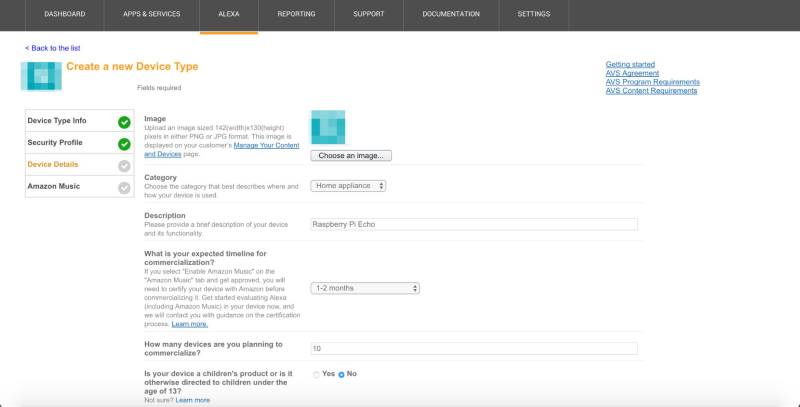
Make sure you enter a small number (like “10”) for the commercialization question, and select “No” when asked if the device is a children’s product. Once you’re done, click “Next”. In the final step you’ll be asked whether you wish to add Amazon Music to your device, select “No”, as we don’t require the integration for now.
Step 3: Install Alexa Voice Service on Your Raspberry Pi
Now that you have successfully configured your Amazon Developer account, the next step is to install the setup files on your Raspberry Pi, and invoke the client service. Here’s how you can install Alexa Voice Service on your Raspberry Pi:
1) Open the terminal on your Raspberry Pi and enter the following command:
The above command will fetch all the code files required for the installation from Amazon’s Github repository and download it to your Pi.
2) Once the download finishes, enter the following command.
It will open up a text editor, which should look something like this:

You’ll need to enter your authentication credentials (Client ID and Client Secret that you noted in the first step) in the bash script. You’ll need to set the “Device Type ID” (the ID that you gave to your device in the first step) as the ProductID
NOTE: Product ID is NOT the Security Profile ID.
You can use the arrow keys or mouse to alter the bash script and once you’re done, press Ctrl + X to save the script and exit the window.
3) Once you’re on the terminal screen again, type in the following command to initiate the automated installation of Alexa on your Raspberry Pi:
When you type in the command, it will open up a prompt window, where you’ll be asked multiple questions. Just type “Y” for each question to breeze through the setup. Once you have answered all the questions, the installation process should begin. It will take at least 30-45 minutes for the setup to complete (depending on your Internet connection speed), so it’s best to grab a coffee and let Pi do the work.
4) When the installation completes, you should ideally see a screen that looks something like this:

If you see that the setup has finished building and that there are no visible error traces, you have successfully installed the client on your Raspberry Pi.
But, wait, we’re not finished. We managed to install the client, but we also need to invoke the companion service, run the client and then trigger the wake agent. So, let’s move forward to the next step.
Step 4: Run Alexa Companion Service on terminal
Before invoking our AVS client, we need to run the Alexa Companion service. You can think of ACS as the interface (or gateway!) between your client and server. While you can always have multiple clients running on your Raspberry Pi, you can only have a single companion service running on your device.
The Alexa Companion Service listens to communication requests from multiple clients, manages the authentication and pushes the response to AVS servers.
You can start the companion service by entering the following command:
After you run the above command, you should see a screen that’s similar to this:

If it reads “Listening on port 3000”, you have successfully invoked the Alexa Companion Service. Now, minimize the window but don’t close it, and open a new terminal.
NOTE: Do NOT close the window, as we’ll need to run the companion service in the background for communication with AVS servers
Step 5: Invoke AVS client and authenticate the service
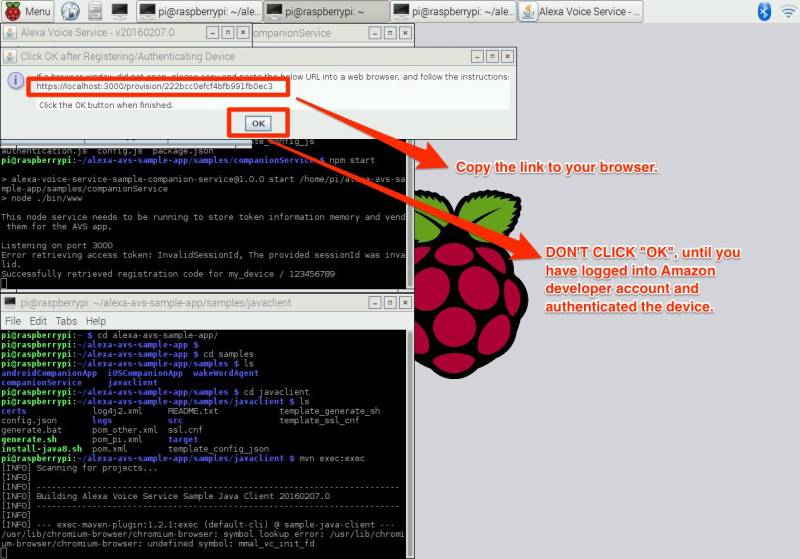
In order to invoke an AVS client, open a new terminal and enter the following command:

Once you run the command, in a few seconds, you will get a popup that asks you to authenticate the device. Copy the URL (just in case) and click “OK”. If you don’t see a window opening up automatically after a few seconds, open the link in your browser.
NOTE: Once you have clicked on “OK” the first time, open the link and authenticate the device. Don’t click “OK” on the second dialog box, until you have logged into your Amazon Developer account.
You can authenticate the device by entering your Amazon Developer account credentials and once you’re signed in, it would ask for permissions. Click “Allow”. If you have entered the correct credentials (Product ID, Client ID and Client Secret), you would get a message that reads “device tokens ready”.
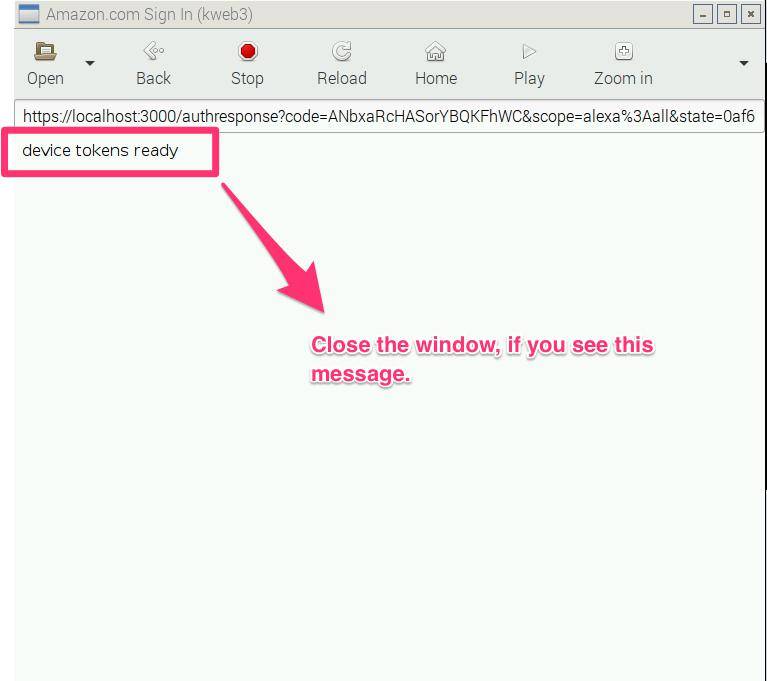
If you get the above message, congratulations! Your client now has the authentication tokens required to communicate with AVS.
Go ahead and click “Ok” on the AVS client dialog box. All the buttons, including Listen, Play and Stop will now be enabled. You can click on “Listen” and say something, like, “Alexa, how are you?”. You should get a response from Alexa. Wow, too cool!
But that isn’t exactly how it’s supposed to work.
Ideally, you should be able to call “Alexa” and just say anything that you want. If you have to click a button every time you wish to tell her something, that’s a deal-breaker, right?
Well, yes, but in order to enable passive listening, we’ll need to trigger the wake word agent. The agent will run in the background and passively listen to our wake word (“Alexa”). When it detects the wake word, it tells our AVS client to start listening.
Now there are two wake word agents available for Alexa– Sensory and KITT.AI. Both of these services are available for prototyping purposes, with the limitation that Sensory expires after 120 days. For my setup, I choose to use Sensory, just because it worked better, but you’re free to pick either wake word agent.
Step 6: Initiate the wake word agent
In order to trigger the wake word agent for your Raspberry Pi-Amazon Echo device, run the following command on a new terminal:
NOTE: Don’t close the terminal window in which the AVS client is running since the wake word agent will connect to your AVS client.

Once you run the above command, your wake word agent will be up and running in a few seconds. If you read a message that reads “Connected to AVS client”, you have successfully binded your wake agent to the AVS client.
That’s it. Your Raspberry Pi is now listening to you. Go ahead and say “Alexa”. You should hear a small “beep” as an acknowledgement, which means it’s now listening to you. You can start out by asking her any question, like, “How’s the weather?” or “How far is Los Angeles from Phoenix?”
Installing AirPlay
While we managed to create a fully functional Echo that can interact with users in real-time, our DIY setup is still missing one important functionality — AirPlay. For instance, Amazon Echo can be paired up with your smartphone or computer to act as a Bluetooth speaker.
Now, although the AirPlay functionality does not come built-in with the AVS setup, you can install it by downloading a few external files. Here’s how you can add that last missing piece:
1) Open the Terminal window and run the following command:
It’ll install all the software you need for running AirPlay on your Raspberry Pi.
2) After the installation completes, run the following command:
3) When the above download finishes, type in:
4) Build the files in the directory by executing the command:
5) Once the build completes, install and test the service by running the following commands one by one (press Enter after each line):
6) When you’re done, install the DIY Airport software by typing:
7) Switch the directory by typing in cd shairport and run the make command.
8) Finally, run the AirPlay service by entering the following command:
Once the service is up and running, go ahead and pair up your smartphone with your DIY Amazon Echo device.
Writing a bash script to trigger Alexa automatically
I know it’s been quite a long tutorial, and it won’t make any sense to run all these commands every time you reboot your Raspberry Pi. That’s the reason I created a bash script that can run all the commands for you.
Here’s the script:
You can save the above script as autorunPi.sh, so that next time you wish to trigger Alexa, you don’t have to run tens of commands. You can run Alexa by just running the command ./autorunPi in your terminal window.
Taking it forward
While the above setup works can be used a replacement to Amazon Echo, there’s still a lot more to explore. For instance, you can configure the Pi to run the script automatically every time Pi boots up. While you can easily do that using cronjob, the tricky part is to automate the authentication workflow, as the AVS client is always required to be authenticated through your Amazon Developer Account in order to get the authentication tokens.
The easiest workaround for circumventing the authentication workflow is to use PhantomJS to automate the process. Alternatively, it’s also possible to authorize Echo from a companion app (iOS/Android), and Amazon has a detailed technical tutorial on how to set that up.
Did it work out for you? I’d love to know how was your experience installing Amazon Echo on your Raspberry Pi. As always if you have questions just post them in the comments section below and I will answer them as soon as possible.

[…] am working on creating an alexa using raspberrypi 3b+ with the blog https://predictabledesigns.com/how-to-turn-your-raspberry-pi-into-an-amazon-echo-dot-using-alexa/. The github mentioned in the blog no longer exists, so I am using the git repo […]
Hi John,
Thanks for the guide, very detailed.
I haven’t started it yet as I just finished another guide on the development forum on Amazon and after a few days of struggle I finally got it partially working only to find out you cannot stream music to it, via Spotify/TuneIn etc… Needless to say I wasn’t overly happy to have wasted a few days.
My plan was to have whole home audio with each zone being controlled with an Alexa. I wasn’t too enamoured with the idea of all those WiFi devices so I thought I’d use a Pi with Alexa flashed and send power and internet to it via a Cat6 cable.
So, when my attempt was scuppered I started to Google when I found your tutorial here.
Will this method allow the AlexaPi to stream music from Spotify etc?
Thanks again,
Mac
“sudo chmod -R 777 /your-installation-directory” and now the error command not found does not appear. However, when I do sudo ~/alexa-avs-sample-app/automated_install.sh after sudo chmod -R 777 /home/pi, I get the following error:
Hi John
Thank you for such a wonderful tutorial. I followed through the steps mentioned, however, I have stumbled across an issue. When I run the command “sudo ~/alexa-avs-sample-app/automated_install.sh” after the command “sudo chmod -R 777 /home/pi”, I get the following error message:-
[INFO] Scanning for projects…
[ERROR] [ERROR] Some problems were encountered while processing the POMs:
[ERROR] ‘dependencies.dependency.version’ for org.mortbay.jetty.alpn:alpn-boot:jar is missing. @ line 59, column 16
@
[ERROR] The build could not read 1 project -> [Help 1]
[ERROR]
[ERROR] The project com.amazon.alexa.avs:sample-java-client:20160207.8 (/home/pi/alexa-avs-sample-app/samples/javaclient/pom.xml) has 1 error
[ERROR] ‘dependencies.dependency.version’ for org.mortbay.jetty.alpn:alpn-boot:jar is missing. @ line 59, column 16
[ERROR]
[ERROR] To see the full stack trace of the errors, re-run Maven with the -e switch.
[ERROR] Re-run Maven using the -X switch to enable full debug logging.
[ERROR]
[ERROR] For more information about the errors and possible solutions, please read the following articles:
[ERROR] [Help 1] http://cwiki.apache.org/confluence/display/MAVEN/ProjectBuildingException
========== Installing Companion Service ==========
npm WARN npm npm does not support Node.js v10.24.0
npm WARN npm You should probably upgrade to a newer version of node as we
npm WARN npm can’t make any promises that npm will work with this version.
npm WARN npm Supported releases of Node.js are the latest release of 4, 6, 7, 8, 9.
I am an engineering student and quite new to Linux, can you please help me figure out the next step.
Thank you in advance.
Hi John,
I am trying to download the Alexa-avs-sample-app.git from gitbub. I created a GitHub account, entered my username and password, but it returns with;
“remote: repository not found.
fatal: repository ‘https://github.com/alexa/alexa-avs-sample-app.git/’ not found”
Should I look for a different repository?
Thanks,
Gabriel
facing same problem
Hi John,
I have successfully installed alexa using avs-device-sdk in my raspberry pi 3B+. But I am not able to get it to talk to custom alexa skills or lambda. Can you please assist?
Thanks,
Hemant.
did you find a solution? i’am in your situation i’m searching that
asks for http://github username and password when putting sudo nano ~/alexa-avs-sample-app/automated_install.sh in
Make an account on github and then enter usrname and pswd for that
I would like to know about the AVS kit.
[1] As we know Alexa Custom Skill can include SSML and sound effect library, customize the intent, identify multi-round conversation, etc. The question is, does AVS has API service as Alexa Custom Skill?
If AVS cannot support the above services, we can only use built-in functions on the hardware.
[2] If we are to find a hardware supplier today who provides us hardware devices, what do you think are the required hardware specifications (chips, microphones, etc) for the use of AVS?
salam ;
for those who have this problem : sudo: /home/pi/alexa-avs-sample-app/automated_install.sh: command not found
the solution is :
cd alexa-avs-sample-app
sudo chmod +x automated_install.sh
cd ..
cd /home/pi/alexa-avs-sample-app
then
. automated_install.sh
you will have to answer some questions and then the magic will begin 🙂
Hi, when I do “.automated_install.sh” i get the error: bash: .automated_install.sh: command not found
Hey I have installed Alexa on my raspberry pi and it runs as well but I am not to able to add skills to it. I want to communitatecommand to a relay which has lights connect to it so that I can control them via voice. Please help me out. I have added the Smart Home skill from amazon developer account in Alexa Services but still no clue.
Raspberry PI 3 my birthday present. First project to give it Alexa skills. I am at same point that Chris and Tanner had in July last year. I get the command not found when trying sudo /home/pi/alexa-avs-sample-app/automated_install.sh. As far as I know I have correctly created an Amazon Developer account and I know I have updated the variables in automated_install.sh. But I cant do the next step. Can you or anyone help. I am a Python / Linux newbie but I love learning
Hi John,
Thanks for the comment. Try the following command:
sudo chmod -R 777 /your-installation-directory
John thanks will try it out on return from a week away
Finally found the time. Thanks very followed your advice and got over that hurdle. Now onto the next
Hi John,
Thanks for explaining with Screenshots, I have followed everything, But the Wake word in not working ?? after Sensory started i dont hear any beep sound. Am i missing anything ??
pi@raspberrypi:~ $ cd /home/pi/Desktop/alexa-avs-sample-app/samples/wakeWordAgent/src && ./wakeWordAgent -e sensory
INFO:main: Starting Wake Word Agent
INFO:WakeWordAgent: State set to IDLE(2)
INFO:Initializing Sensory library | library name: TrulyHandsfree | library version: 5.0.0-beta.10.2 | model file: ../ext/resources/spot-alexa-rpi.snsr
WARNING:Library expires on: License expires on 28 Mar 2018 00:00:00 GMT
INFO:SensoryWakeWordEngine: mainLoop thread started
INFO:WakeWordIPCSocket::mainLoop thread started
INFO:WakeWordIPCSocket: init socket on port:5123
INFO:WakeWordAgent: thread started
INFO:===> Connected to AVS client <===
Hi John, nice work. I completed a very similar project from github with good but not complete success. It seems that using the “talk” button in the java window works to activate Alexa AVS, but the “wake word” does nothing. I’ve posted this question on the github site, with no response yet so I thought I’d throw it out here. Another question is:
Is there a way to boot right into running Alexa AVS at startup. And if you termin the service how do you restart it? IE: Do you have to through the multiple terminal window approach each time you start it up? Thanks for any enlightenment on the processes.
We all loved this post. Thanks for posting this informative post. It contains a lot of information in it.
Hi,
am I able to control alexa devices?
Like Alexa compatible RGB controllers, etc.
wake word does not work till i hit the mic button then works ok till i wait a while between wake words (10 to 30 sec) then it stops here is log below when state set to idle(2) comes up it stops working till i hit the mic button… am i missing something or is that the way its suposed to work..
frank
INFO:main: Starting Wake Word Agent
INFO:WakeWordAgent: State set to IDLE(2)
INFO:Initializing Sensory library | library name: TrulyHandsfree | library version: 5.0.0-beta.10.2 | model file: ../ext/resources/spot-alexa-rpi.snsr
WARNING:Library expires on: License expires on 28 Feb 2018 00:00:00 GMT
INFO:SensoryWakeWordEngine: mainLoop thread started
INFO:WakeWordIPCSocket::mainLoop thread started
INFO:WakeWordIPCSocket: init socket on port:5123
INFO:===> Connected to AVS client <===
INFO:WakeWordAgent: thread started
INFO:WakeWordAgent: IPC Command received:3
INFO:WakeWordAgent: State set to WAKE_WORD_PAUSE_REQUESTED(5)
INFO:SensoryWakeWordEngine: handling pause
INFO: *** THREAD JOINING: Sensory ***
INFO:SensoryWakeWordEngine: mainLoop thread ended
INFO:WakeWordAgent: State set to WAKE_WORD_PAUSED(6)
INFO:WakeWordAgent: IPC Command received:4
INFO:WakeWordAgent: State set to WAKE_WORD_RESUME_REQUESTED(7)
INFO:SensoryWakeWordEngine: handling resume
INFO:SensoryWakeWordEngine: mainLoop thread started
INFO:WakeWordAgent: State set to IDLE(2)
hey john,
i get “command not found” when running the command “sudo ~/alexa-avs-sample-app/automated_install.sh”
can’t figure out the reason
I think you and others are having issues with permissions, probably because you are extracting the files in the root-directory. This is preventing you from being able to execute the script file.
It’s more of a Linux issue than an RPi problem. The easiest fix is to run:
sudo chmod +x automated_install.sh
in the avs-sample-app directory.
See this link for more information on this issue: https://askubuntu.com/questions/409025/permission-denied-when-running-sh-scripts/572435
Okay, hope this helps.
John
the solution is :
cd alexa-avs-sample-app
sudo chmod +x automated_install.sh
cd ..
cd /home/pi/alexa-avs-sample-app
then
. automated_install.sh
When I was trying to do the last command for the air port I got -bash: ./shairport.pl: No such file or directory
Good morning, John,
first sincere congratulations for your work and sharing.
I’m french and sorry for my bad language English, I’m novice Linux I discover Raspberry with magazines.
I followed your tutorial scrupulously, I can launch the final script that automatically opens the three windows in the terminal and the “Alexa voice service” window that is active but unfortunately no sound.
I have a helmet / microphone on Usb port that works when I launch the Vlc application, it is properly configured in the dashboard of the Raspberry but no sound with Alexa.
Here are some elements:
First Window: Listening on port 3000
Successfully retrieved access token for session id: ******
Second Window: INFO: WakeWordIPCSocket: init socket on port: 5123
INFO: ===> Connected to AVS client <===
INFO: WakeWordAgent: thread started
Third window: [INFO] Scanning for projects …
[INFO]
[INFO] ———————————————– ————————-
[INFO] Building Alexa Voice Service Sample Java Client 20160207.5
[INFO] ———————————————– ————————-
[INFO]
[INFO] — exec-maven-plugin: 1.2.1: exec (default-cli) @ sample-java-client
The fourth window is: Alexa Voice Service.
And in that windows as soon as I click in "Tape to speack Alexa", In the third window I get the message "ERROR: An error occurred in the mainLoop of SensoryWakeWord snsrRun (): task: Input channel audio-pcm: ALSA error: Invalid argument",
I tried different updates without success.
Thank you in advance for your help and attention.
Best regards, cordially.
Jean Vasseur
Hi John,
Is there a voice command library that doesn’t require an internet connection? Something that runs completely on the device instead of talking back to the internet?
Hi Han,
Yes there are, and in the past voice recognition systems were completely self-contained. However, from my experience they aren’t as nearly as sophisticated as Alexa or Google.
John
Hi John, here are the 2 commands and the responses.
pi@raspberrypi:~ $ sudo ~/alexa-avs-sample-app/automated_install.sh
sudo: /home/pi/alexa-avs-sample-app/automated_install.sh: command not found
pi@raspberrypi:~ $ ~/alexa-avs-sample-app/automated_install.sh
bash: /home/pi/alexa-avs-sample-app/automated_install.sh: Permission denied
I have had some progress by removing the permission as previously advised but the end result (after a long installation) was a large number of errors.
Rgds
Frustrated of Suffolk, UK.
Try changing to the alexa-avs-sample-app directory then use “bash automated_install.sh”. If that doesn’t work, try sudo in front of the bash command.
I think I may have resolved that issue by changing the permissions from nobody to anyone. I suspect you may need to change the file permissions for the downloaded file?
But what do I know….!
Rgds.
Hi John, no nearer I’m afraid.
bash responds
/home/pi/alexa-avs-sample-app/automated_install.sh :Permission denied
Rgds Chris
Hey Chris,
My apologies. Instead try “sudo ~/alexa-avs-sample-app/automated_ install.sh”.
John
Thanks John,
Tried sudo before but didn’t work either. Finally worked out how to change the file permission and it’s currently downloading and unpacking. Little steps,,but getting their!
Hey Chris,
I think you’re getting the error, because the package that you downloaded has been unpacked with read-only permissions.
Use the following command to get write permissions to the file:
sudo chmod -R 777 /your-installation-directory
Also, it’s not necessary to use the bash for it. You can even navigate to the script file from your file browser and edit in in Notepad or GEdit.
Hope that helps!
Abhi
Chris,
I’m having the same problem you had –
pi@raspberrypi:~ $ sudo ~/alexa-avs-sample-app/automated_install.sh
sudo: /home/pi/alexa-avs-sample-app/automated_install.sh: command not found
How did you get past this? I’m not sure how to change the permissions on these files.
Thanks!
Tanner
Right click properties permission tab
Thanks John, I’ll go at it again and let you know. I’m completely new to this so it’s a big learning experience. Not without it’s frustrations but a huge sense of achievement when complete. Best regards.
Chris
Was going well until “. automated_install,sh” gives No such file or directory error.
I’m new to this so have no idea where to go now!
That should have read was ” . automated_install.sh” i.e not with the comma!
Thanks Chris for pointing out this error. I’ve corrected this step in the article now.
Thanks again!
John