
Auto-Generated Firmware Code: Deconstructing an STM32CubeMX Project
In this article we’ll deconstruct the auto-generated STM32Cube initialization code and go over examples of how and why it can break down.

There’s no doubt that code generation tools for embedded software like STM32CubeMX are great timesavers, especially for newer embedded developers.
STM32 chips are advanced microcontrollers, especially when coming from a comparatively simple platform like Arduino.
Having the ability to use a sleek UI to assign peripherals to pins, set clock speeds, and more and then spit out ready-to-use initialization code can be invaluable.
However, there can be pitfalls to using such a system that can matter more as the developer and project becomes more advanced.
And it can be just as valuable to understand how that code is generated so that when something inevitably does go wrong, you have the background knowledge to investigate and identify the issue.
Let’s start by looking at an example STM32CubeMX project using the popular STM32F103C8 microcontroller. It is featured on the Blue Pill development board that finds its way into many hobbyist projects using STM32.
After downloading STM32CubeMX from the website and running it, you will be greeted with the following window:

Use the MCU selector to create a new project based on the STM32F103C86. A new project looks like this:
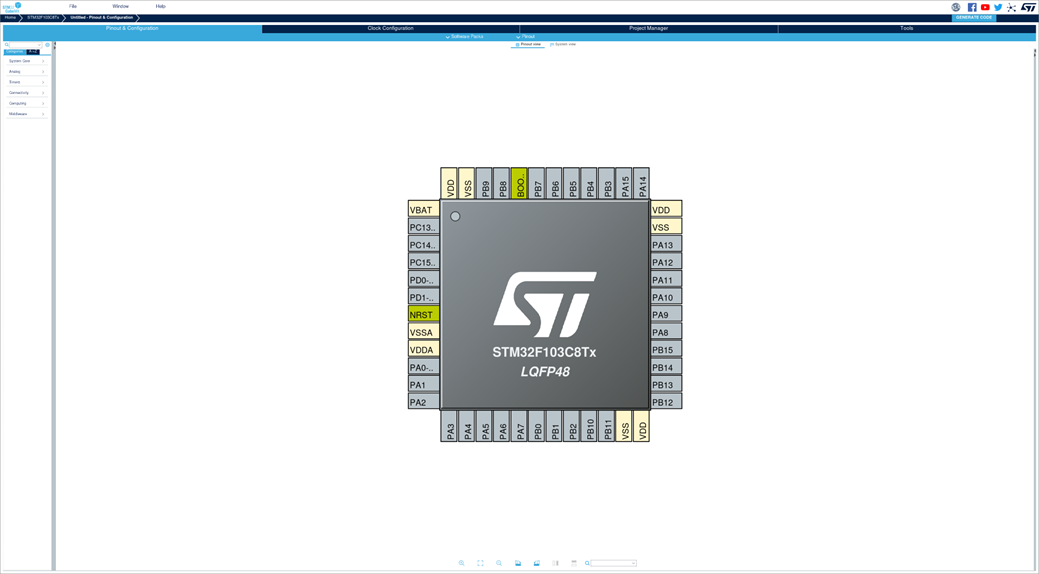
For this example, I will be using a few different peripherals — an I2C bus, an ADC, and a serial USART connection — as well as some GPIO configured to act as inputs.
I will also enable interrupts for the USART and GPIO, and set up an SWD debugging connection. After adding those components, the project looks like this:

With the peripheral setup complete, it’s time to generate the code for the first time and begin diving into the project structure.
To do this, go to the Project Manager window and name the project as well as set the project location. Use the Advanced application structure and select Makefile for the toolchain/IDE.
At this point we can now click Generate Code at the upper right and the tool will create the project in the location we specified.
It copies the firmware package for the selected microcontroller to the project.
It also generates application *.c/*.h files that reference the firmware package to create initialization code that will set up the peripherals in the way that we specified in the STM32CubeMX interface
When the generation process is complete, we can now visit the location where the project was saved and observe the files. There should be two folders and a collection of assorted files in the project root.
The folders, Core/ and Drivers/, contain respectively the generated application code (including main.c) and the firmware package for the MCU.
The files will include the *.ioc file that serves as the STM32CubeMX project file, as well as a Makefile for building the project. We are most interested in the folders, however, as they contain the source code for the project.
The Drivers/ folder does not contain any auto generated code, except for the firmware package for the MCU series the user selects.
This is primarily ST’s HAL API for STM32 microcontrollers, which provides an abstracted interface to the hardware with helper functions and data structures for all peripherals that chip has to offer.
Using this API is still more advanced than, say, Arduino’s API, since the initialization for STM32 peripherals is designed to be more flexible and allow fairly low-level control over the peripherals.
But it is perfectly possible to develop application code from scratch using this API.
Outside of the STM32Cube tools, the firmware package can be obtained from ST’s Github.
The particular firmware package being used in this project is the STM32CubeF1 package, found here. A subset of that repository’s own Drivers/ folder is what has been copied into our project.
Looking inside our Drivers/ folder, we find a further split into two more folders: CMSIS/ and STM32F1xx_HAL_Driver/. The STM32F1xx_HAL_Driver/ folder is what contains the aforementioned HAL API.
The CMSIS/ folder, however, contains the CMSIS source and header files outlining the device registers, or the specific memory mapping for all the peripherals.
At its core, the way that all peripherals like UART, I2C, etc. are actually controlled in an MCU is by changing specific values in memory. The CMSIS headers simply define the specific locations in memory that each peripheral’s register resides.
For example, a GPIO output is actually controlled by writing to the peripheral’s ODR register.
To use CMSIS headers to toggle GPIOC pin 13, the following code snippet can be used:
GPIOC→ODR ^= GPIO_ODR_ODR13;
GPIOC, ODR, and GPIO_ODR_ODR13 are all locations in memory defined in the CMSIS headers.
Using the CMSIS headers in conjunction with an MCU’s datasheet and reference manual are the bare minimum a user needs to actually write a program for an ARM microcontroller.
The HAL API (which stands for Hardware Abstraction Layer) provides an abstracted wrapper around these CMSIS operations, based on the specifications outlined in the device datasheet.
The same example of toggling the GPIO pin can be implemented with HAL as follows:
HAL_GPIO_TogglePin(GPIOC, GPIO_Pin_13);
The benefit of using such an abstraction is clear. The user does not need to have low-level information about what registers do what in order to write code for the MCU.
The HAL_GPIO_TogglePin() function is doing all that legwork. There are, however, valid reasons for not using the HAL API (I personally do not), but they are mostly outside the scope of this article.
To just give some brief reasons, using direct register access is generally faster than the HAL API, since there is a lot of potentially unnecessary software between calling the function and writing to the ODR register.
As the complexity of the peripheral increases, so does the severity of this issue.
Additionally, the HAL API has been critiqued specifically for being poorly written or for the software being potentially unsafe. In applications where code reliability or speed are absolutely critical, you may not want to use it.
We can now move away from the drivers to the Core/ folder, which actually contains our auto generated code.
As a reminder, this code is automatically applying the HAL API to create initialization functions for the peripherals, but users will still have to reference the API on their own to begin using these peripherals.
To begin observing this, we will navigate to Core/Src/ (which contains *.c source files for the project) and open main.c.
Below is a snippet from that file, with some comments removed for brevity:
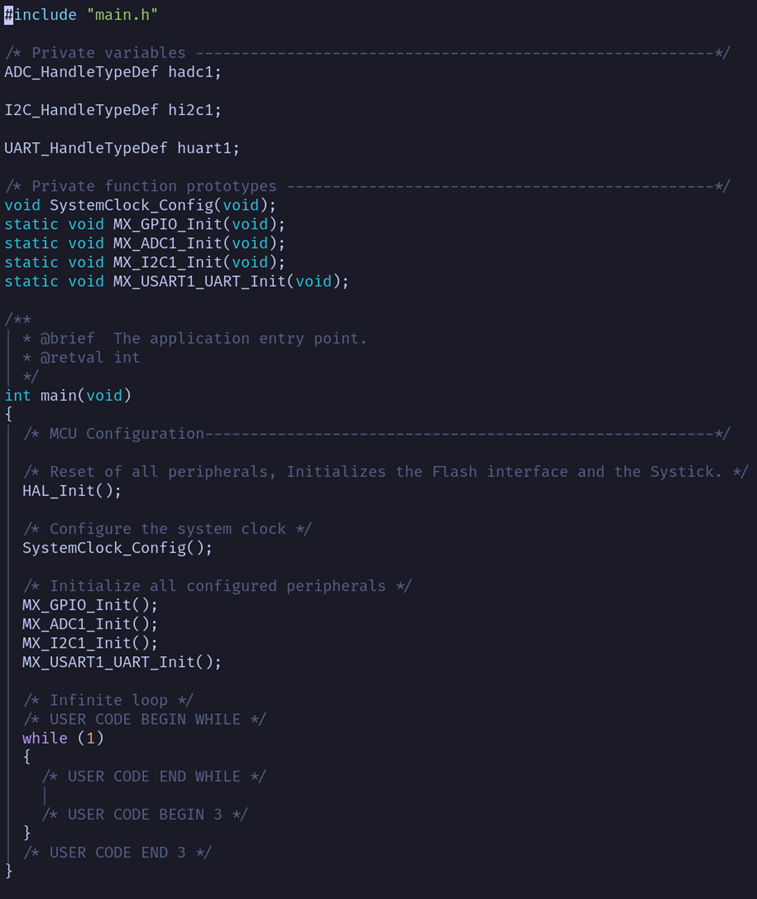
First, note that for each of the non-GPIO peripherals we created, there is a variable initialized: hadc1, hi2c1, and huart1.
These are typdef’d structures provided by the HAL API and are used whenever a user wants to control a given peripheral.
For example, HAL_ADC_Start(), which starts ADC data capture, will take hadc1 as an argument. GPIO is simple enough that its use doesn’t require a data structure.
Next, there are five functions defined. The initialization functions for all hardware peripherals are the primary benefit of STM32CubeMX.
There is the SystemClock_Config() function, which is called no matter what and sets up the Core CPU clock as well as the peripheral clocks, and init functions for each of the four types of peripherals we set up in CubeMX.
These five functions are now called in the main() function, so that if we compiled this code and uploaded it to the target microcontroller, all of these peripherals would be set up and ready to use.
The HAL_Init() function is called before anything else to perform global setup related to the API.
To further break things down, let’s take a look at one of the initialization functions, MX_USART1_UART_INIT():
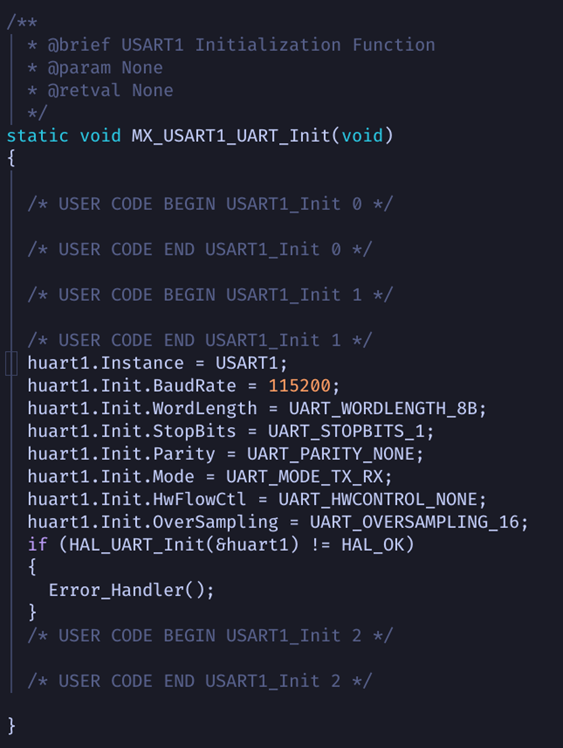
Here we see that the aforementioned huart1 structure is being populated with values critical to its initialization and definition.
Since each USART peripheral available on the microcontroller uses the same struct type, we first specify that this one is referencing USART1 by setting its Instance member.
Then, its Init sub-struct is populated with all the parameters necessary to define its behavior: the baudrate, whether or not we are using hardware flow control, etc.
Note that with access to the documentation this function could have easily been written from scratch by a user as well — the HAL API is not restricted to usage by these auto-generators.
Finally, this structure is passed as an argument to the HAL_UART_Init() function, which takes its various members and writes to the necessary registers to initialize the peripheral.
Each of the other Init() functions tells a similar story.
The struct is populated with information about the instance of the peripheral being configured and any initialization information (which can be edited in STM32CubeMX).
Then it is passed into the HAL_Init() function for that peripheral.
More advanced STM32 users may have noticed that these initialization functions do not seem to take any information regarding the pins being used for these peripherals.
USART1, for example, is able to use pins other than the PA9/PA10 that we set up in this project.
Where is information like that defined?
The answer can also be found under Core/Src/, in the file stm32f1xx_hal_msp.c.
The HAL API weakly defines empty MSP_Init() functions for both the global API and each peripheral.
If the user redefines them, or in this case the auto generator does, then in HAL_Init() and in each peripheral’s HAL_xxx_Init() function these MSP functions are called before the peripheral itself is initialized.
MSP stands for MCU Support Package and is intended for any supporting initialization required for a peripheral before the peripheral itself is set up.
For example, before setting up the USART peripheral, HAL_UART_Init() will execute this function found in stm32f1xx_hal_msp.c:
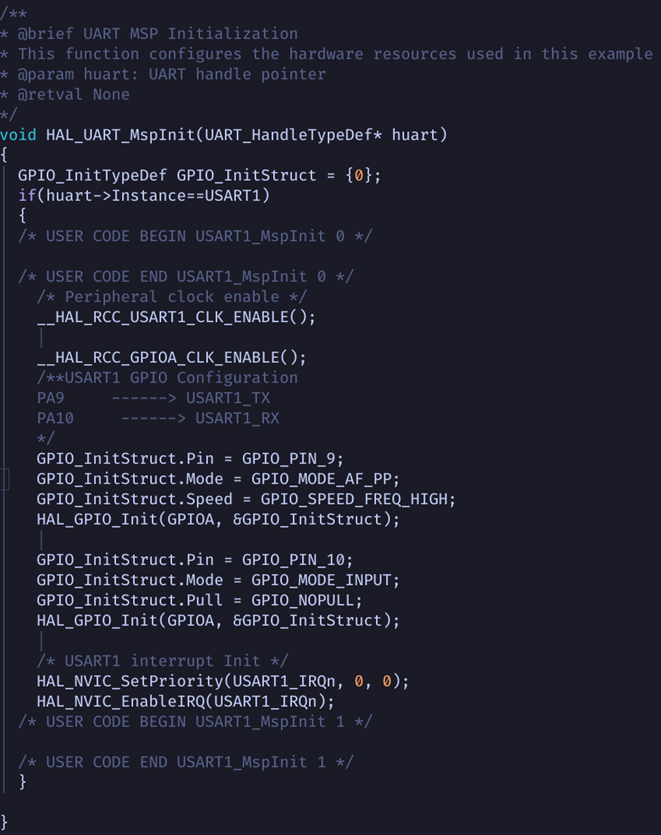
Notice this function sets up the peripheral/GPIO clocks, sets up the GPIO pins in their required modes to use UART, and then configures the interrupt for the peripheral.
None of these items are directly modifying any UART registers, but they set up external requirements for the peripheral to operate properly.
If you are using a DMA controller, the linkage between a peripheral and DMA is also done in this MSP file.
There are two remaining source files in Core/Src/.
system_stm32f1xx.c would actually be required in some form even when not using the HAL API.
It initializes very fundamental elements to the device operation like the initial clock source, clock frequency, and sets up any external memory controllers. Because of this it will likely not be touched in many applications.
stm32f1xx_it.c defines the IRQ handlers for all of the interrupts enabled, both critical system interrupts like fault handlers or system tick increments as well as interrupts for peripherals.
Continuing to use UART as an example, here is the autogenerated handler for the USART1 interrupt that we enabled in CubeMX:

This interrupt was enabled in the MSP file. There is a startup file, written in assembly, that is present at the project root that creates weakly defined function definitions for all possible interrupts.
Two things have been done with the MSP function and this file – the interrupt was enabled, and the interrupt handler was redefined so that when a UART interrupt is fired, something useful can happen.
For the most part, the files under Core/Inc are less interesting, simply a header file that exposes the IRQ handler functions and another mostly empty main.h.
There is, however, a configuration header file that must be used when applying the HAL API, stm32f1xx_hal_conf.h.
Its purpose is to enable/disable various peripherals so that when including the API main header file, we are not needlessly including peripheral drivers that aren’t being used.
It also defines other things like oscillator frequencies, core interrupt priorities, etc.
And with that file, we come to the end of the application code – this is the entirety of the autogenerated project, as well as what would otherwise be required when implementing a project using the HAL API.
Downsides of using autogenerated code?
At first glance it seems extremely convenient and powerful, however while that is the case, it is also not infallible.
The first downside is the possibility of failure – MCU programming at the low level can be very complicated, and there can be a variety of edge cases that both the HAL API and the autogenerated code have to work around, which can sometimes be missed.
One example I personally encountered early in my programming journey was that the auto generated code allowed tying a DMA controller to a peripheral that it did not actually have hardware access to.
Thus, the generated software would still compile, but when I tried to actually use the peripheral the program crashed with a HardFault exception.
Examples like this were repeated as I continued to use the tool, but I was able to resolve each problem when I went back down to the documentation and investigated how I would implement the desired functionality from scratch.
One more potential downside is the rigidity of the autogenerated code structure. You will notice that ST provides “USER CODE” comment blocks between which application code can be written and persist even if the code is regenerated.
Beyond that, though, the structure of the code is locked in place as is. This can be an issue if, for example, you are writing code that must work on multiple iterations of a board.
This means that on startup your microcontroller must identify which board version it is on and branch to a different initialization depending on the version.
With the STM32Cube structure, implementing such a thing becomes awkward, as one version’s initialization function can be auto generated, and the other must be manually placed in a “USER CODE” block.
It is usually workable, but can lead to messy code and poor practices as a result of working around the auto generator rather than with it.
This is not to say you should avoid auto generated code for these reasons. However, in the long term it should not be used as a crutch that prevents you from understanding how your application would be implemented without it.
Once you acquire enough experience, you can identify any mistakes the auto generator makes and work around any limits it introduces.
For many applications, auto generated code greatly streamlines the development process and enhances collaboration.
Written by Brandon Alba

Yes, that is definitely a nice analysis of the pros and cons of using CubeMX. I use it a lot, the thought of using CMSIS for everything make me ill! However I think I should try it some time and see what differences it makes and how hard it is program at that level.
I have recently encountered another situation where CubeMX generates unworkable code when using DMA with a USART. The code generator would put the initialization code for the DMA after the initialization code for the USART. Unfortunately the order was wrong and the DMA would not work properly until the .ioc file was modified to force the correct order. As far as I know, that bug has not been corrected yet. So I have this comment in my code:
/****** IMPORTANT NOTE *****
CubeMX sometimes puts MX_DMA_Init below MX_USARTx_UART_Init.
If this happens,
Open the .ioc file in a text editor and delete the line ProjectManager.functionlistsort-….
Regenerate code.
A new version of CubeMX will fix this issue.*/
/* USER CODE END SysInit */
/* Initialize all configured peripherals */
MX_GPIO_Init();
MX_DMA_Init();
MX_CRC_Init();
MX_I2C1_Init();
MX_RTC_Init();
MX_SDMMC1_SD_Init();
MX_SPI2_Init();
MX_TIM6_Init();
MX_USART1_UART_Init();
MX_USART2_UART_Init();
MX_FATFS_Init();
MX_TIM7_Init();
MX_UART4_Init();
I found this problem by searching the ST.com discussion forums. They have been very helpful for me.
So…when things aren’t working right, do not automatically assume that HAL code is always correct or that CubeMX did its job properly. Most of the time it generates workable but probably inefficient code but sometimes it doesn’t. The ST discussion forums are a good place to learn about good techniques and bug fixes.
Hi, that’s a great analysis, i also add incompatibility of the generated code with C++ files and CMakeLists. However, still, i prefer extending generated code rather that writing my own from scratch.
Thanks Hossein!