
Introduction to the STM32 Blue Pill (STM32duino)
In this article you will learn how the STM32duino stacks up against an Arduino and how to make it compatible with the Arduino integrated development environment (IDE).

If you are planning to use an Arduino for an early prototype of your product, then you should also consider the more powerful STM32duino development board.
Commonly referred to as the STM32 Blue Pill, this board has nearly all the capabilities of the Arduino module but with a cheaper price.
There are only two main issues. First, it is not compatible with most Arduino shields due to differences in size and pinouts. In most cases, it can still use those shields. It’s just that these shields simply cannot be piggy-backed on the module.
Second, there are some steps that have to be taken before it can run Arduino code. There are even more steps to be taken if it is to be made compatible with the normal way Arduino code is downloaded into the target module using the PC’s USB port. As received, the board will do neither of these.
While the mechanical incompatibility with Arduino shields cannot be fixed, it is possible to make it compatible with the Arduino development system. This is the subject of this article.
STM32duino Versus Arduino Uno
Table 1 provides a brief comparison between the most common STM32duino Blue Pill board and the typical Arduino Uno.
One can easily notice that the Blue Pill is superior to the Arduino Uno in almost all aspects, except, in the mechanical compatibility of Arduino shields which are mostly designed for the Uno form factor.
In terms of physical size, Figure 1 shows a side by side comparison of a typical Uno, an STM32Duino and an Arduino Nano. The STM32Duino is noticeably smaller than the Uno, but longer than the Nano. Figure 2 below shows the pinout of a Blue Pill board.
Note, however, that the Nano does not have a USB interface to the development system, which necessitates having a separate USB to serial converter, such as the FTDI232, to download code to it.
| Feature | Uno | STM32duino | Comments |
| MPU | ATMega328 | STM32F103C8T6 (Cortex M3) | |
| Flash (KB) | 32 | 64/128* | *128K in some models. |
| SRAM (KB) | 2 | 20 | |
| EEPROM (KB) | 1 | None | |
| Speed (MHz) | 72 | ||
| Bus Width (bits) | 8 | 32 | |
| UARTs (HW) | 1 | 3 | Not all of the HW modules can be used at the same time due to pinout limitations. This applies to both types. |
| SPI | 1 | 2 | |
| I2C (HW) | 1 | 2 | |
| Timers | 2 (8 bit) + 1(16 bit) | 3 (16 bits) + 1 (advanced type) | |
| Other | None | 32.768KHz RTC crystal clock | |
| ADC (bits) | 10 | 12 | The Uno can use internal ADC reference, but the Blue Pill uses VCC reference. Thus, the Uno ADC can be more accurate. |
Table 1 – Major HW comparison between an Arduino Uno and the STM32duino
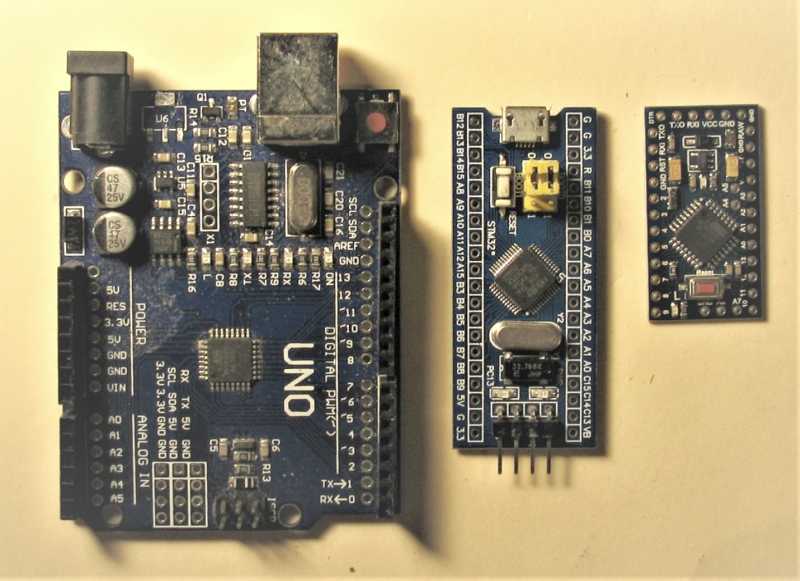
Figure 1 – Side by side comparison between Arduino Uno, STM32duino and Arduino Nano (L to R)
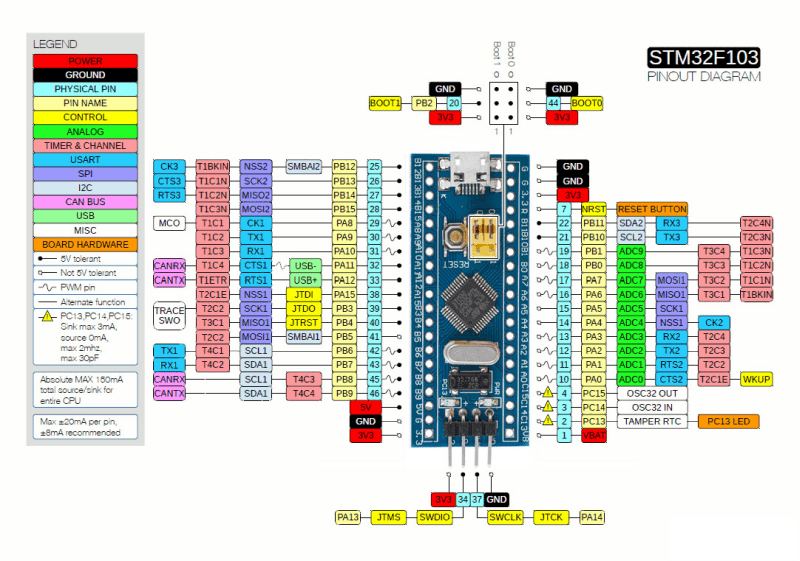
Figure 2 – STM32duino pinout and pin function description
There are other less obvious differences as well, and some may be important in certain applications. Here are some of them:
- Because the Blue Pill is inherently a 32-bit system, its integers are naturally 32-bit wide, as opposed to being 8-bit wide for the Uno.
- What that means is that, for example, adding two 32-bit integers is just one operation in the STM32duino, but is actually four 8-bit additions, with carry over, in the Uno. This is done transparently in the SW, but the net result is it takes a bit more code space, and it executes more slowly.
- While it is entirely possible to have more than one UARTs, or I2C, in the Uno by using software emulation, this requires more code and takes more of the MPU resources away from other tasks. Given the already lower clock speed of the Uno, this may be an issue in some applications.
- The same arguments of firmware and resource use apply for the timers. In the Uno, it is possible to add code to make longer timing intervals, or to add multiple timer events, but at the expense of more code and thus more code execution times.
- While the Uno ADC is 10 bits and the Blue Pill is 12 bits, the Uno can use an internal bandgap ADC reference while the Blue Pill can only use its VDD. All in all, the Uno ADC might be more accurate despite its lower ADC resolution.
- EEPROM functionality can be emulated in the flash memory of the Blue Pill. This does require some code and processor resources to manage though.
- Because of the increased hardware resources of the Blue Pill module, it is entirely possible to run FreeRTOS on it, and many applications could benefit from this.Note that while still possible for the Uno, the benefits of having FreeRTOS should be carefully weighed against resource consumption. FreeRTOS for the STM32duino can be downloaded here.
What you need to make the STM32duino Arduino compatible
As already presented, the Blue Pill and the Uno have very different microcontrollers, and different IO and peripheral arrangements. Yet, with the proper setup they can both run Arduino.
There are several things that must happen in order to make any microcontroller board, including the STM32duino, Arduino compatible. This section briefly explains what those are, before detailing the actual instructions for accomplishing this compatibility.
The Arduino core itself must be somehow pre-loaded in the microcontroller. This is the built-in code that supports basic Arduino functions such as digitalRead or digitalWrite.
Then there is the bootloader. While this is not strictly necessary, as the STM32 already has a bootloader that can be used with an STLink V2 device programmer, it is a lot more convenient to use USB for downloading Arduino programs to an Arduino board. This is the approach taken in this article.
Because Arduino code is basically a wrapper over regular C/C++ code, a compatible C++ compiler needs to be installed in the Arduino IDE. While the compile can turn user code into binary files compatible with the STM32F103C8T6 microcontroller of the Blue Pill, it still has to know something about how the actual board is built.
Everything from what IO pins are accessible, to what their assigned names are, to what crystal frequency is used, towhat IO the built-in LED is driven by, must be known. This “board definition” file must be known to the compiler in order to properly compile the final binary.
Finally, the proper device driver must be loaded in the PC so that the Blue Pill USB is seen as a serial port on the PC for downloading code from the Arduino IDE.
The last two steps need to be done only once per setup. As long as the same PC, with the same Arduino IDE development setup, is used these steps do not need to be repeated.
Preparing the PC and Arduino IDE
To prepare the Arduino IDE, first launch the IDE. Make sure it is the latest version. The version must be at least 1.8.X. X is, at this time, 12. Go to Tools > Board “???” > Board Manager…, where the “???” is the currently selected board in the IDE. This is shown in figure 3.
From the Board Manager, simply search for “STM32F1XX/GD32F1XX boards by STM32duino”, and install it.
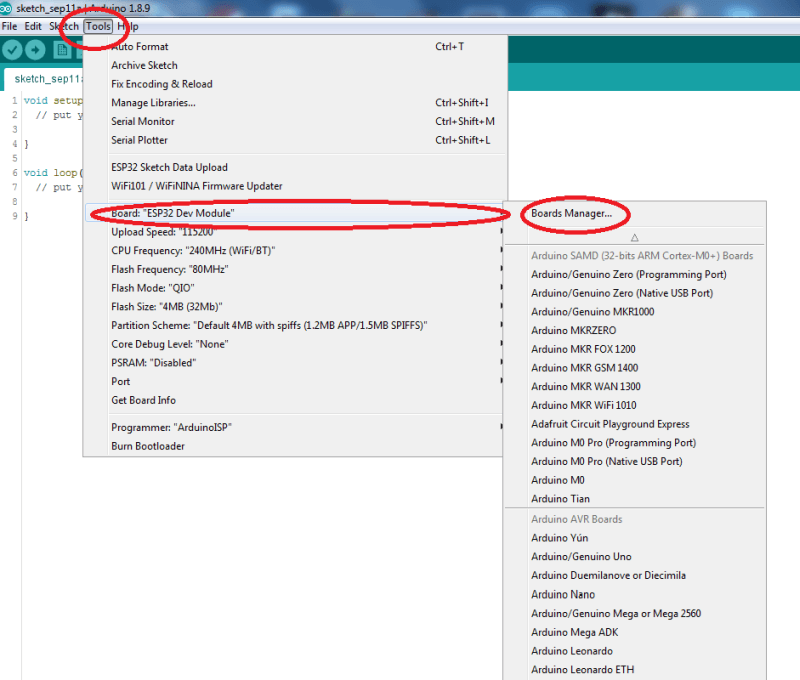
Figure 3 – Getting to the Board Manager menu item
Next, download the com drivers here. Unzip the file and go to the Arduino installation folder. It is usually C:\Program files(x86)\Arduino
Now go to the hardware folder. In the hardware folder, drag the “Arduino_STM32-master” from the ZIP to the hardware folder, and rename it to Arduino_STM32.
Now, open the Arduino_STM32 folder. There is a folder inside that’s named drivers. Somewhere in that folder there will be a file named “install_drivers”. Just click on that, and the drivers should install. Just reply “yes” to everything that’s being asked.
This link provides steps for Linux and Mac. This completes the PC part.
Flashing the bootloader into the STM32duino
This step is not strictly necessary in order to run Arduino code on the STM32duino. It is possible to use an STLink V2 device programmer to download code into the board.
However, this step is highly recommended. First of all, it makes the board behave more like a regular Arduino board. Secondly, it is somewhat easier to develop code with a simple USB cable from the PC to the board rather than using the STLink V2 every time.
The Blue Pill boards are available from places like Amazon. If you don’t need them right away, they can be bought from AliExpress. This vendor is presently selling them for about $1.75 each.
The next required piece is an ST Link V2 programmer. The official ST programmer can be bought from Digikey.
However, there is a cheaper clone version from Adafruit that works just as well. It is about half the price of the official version, and can be found here.
With a bit of patience, even cheaper options are possible. Here is a link for a really inexpensive one. It is identical to the previous one, but is about one fifth the price.
The two different programmers are shown in figure 4, with the original on the left, and the clone on the right. For this article, the clone will be used. However, the original works just as well. Note that the clone usually ships with the “Dupont” cable assembly. This is the small cable shown in the middle part of figure 4.

Figure 4 – ST-Link V2: Original on the left and clone on the right
First, download and install the STM32 ST Download utility here. Note that ST does require a name and e-mail to allow the software to be downloaded. Next download the actual bootloader from here.
The next step is to connect the Blue Pill to the ST-Link V2 (figure 5). Just connect the corresponding pins on the ST-LinkV2 clone to the STM32duino.
Note that there are two GND’s and two 3V3’s on the ST-Link V2. Any one of them will do for the 3V3 and GND. Also move the STM32duino jumpers to the “1” position as shown.
After the connections are made, just plug in the ST-Link V2 into a PC USB port. The STM32duino will probably be dangling off the USB port, but that’s fine.
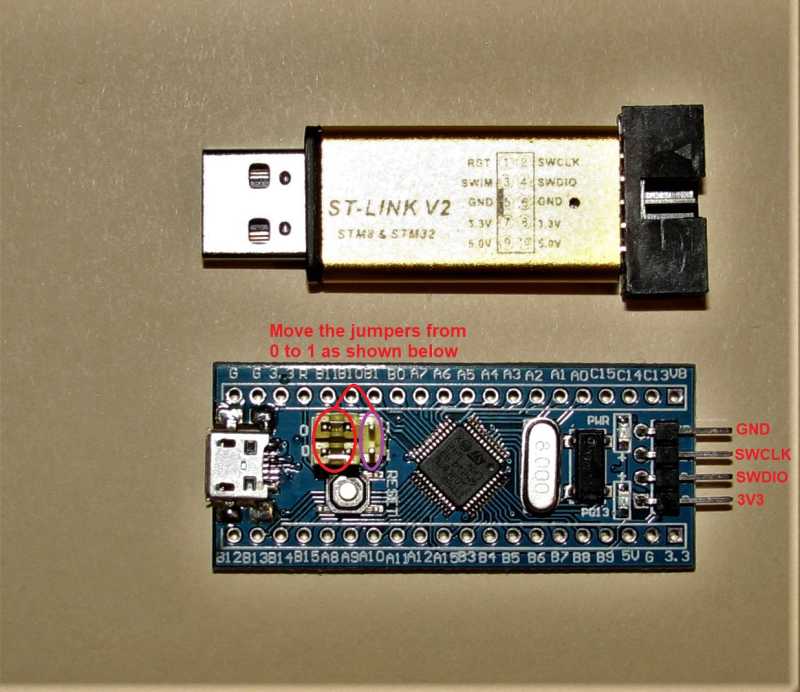
Figure 5 – STM32duino and ST-Link V2 clone
Now, start the STM32 ST-Link Utility. A screen similar to the one shown in figure 6 will appear. From there, navigate to “Target”, and then in the sub-menu, click on “Connect”. If a successful connection is made, a screen such as that shown in figure 7 is displayed.
Note that the connection information also displays information about the target device. In particular, note that some STM32duino’s have 128KB of flash instead of 64KB. The last step is to actually load the file containing the data to be flashed, and download this data to the Blue Pill MCU.
So, from the File menu open the bin file downloaded earlier. The main area of the ST-Link Utility now shows the content of this file. Next, go to the Target menu item, and select Program & Verify. This screen is shown in Figure 8.
Just follow the instructions from there. The status window should then show a successful flashing operation. Remove everything and put the Blue Pill jumpers back to their original “0” positions. The board is now ready.
For good measure, give it a try. Just load a simple “Blink” example from the Arduino IDE. Without going into too much details, just make sure that:
- The proper COM port is selected.
- The board is set to “Generic STM32F103C series”.
- The Upload method is set to STM32duino bootloader.
Use this setting for all future development using the STM32duino.
Figure 6 – Initial ST-Link Util screen
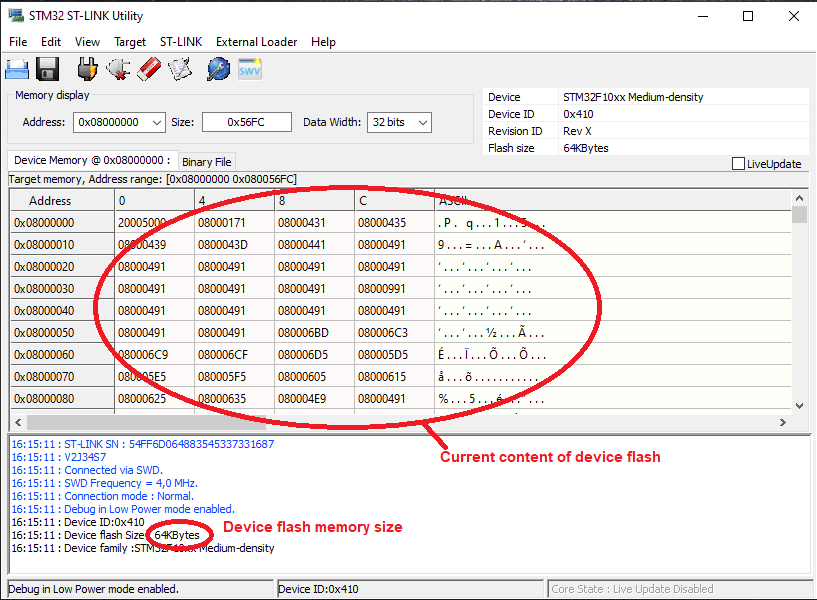
Figure 7 – ST Link Util successful connection to target device

Figure 8 – Ready to “Program and Verify” the firmware
Conclusion
The STM32duino is a very good alternative to a regular Arduino such as the Uno, provided physical compatibility with existing Arduino shields is not required. It is much more powerful, and costs a lot less.
It does take a bit of work to get it to work like a regular Arduino board. However, many of these steps only have to be done once. After the initial setup is completed, this configuration provides many benefits.

The only thing I think the article is missing is power consumption, Arduinos can last a lot longer on batteries.
John, just like your other articles, excellent post. However, the Arduino shown on extreme right in Figure 1 is actually the Pro Mini, not the Nano.
Cheers,
Jay
Hello John,
I understand that if you go this way you don’t need to use any ST IDE anymore right? Although I am not a fan of the Arduino IDE because it lacks debugging capabilities, I like to use it in projects where I have to interface with external modules since the wealth of good quality libraries is abundant.
I understand that by using the Arduino IDE to program a STM32 MCU then this allows you to use the Arduino libraries like for example an LCD screen library?
Thank you
Hi Roberto,
Thanks for this question. Since you are a member of the Hardware Academy I’ve answered your question in the Academy community area.
Hi John!
I haven’t check if the BOOT0 pin is available on the STM32 Blue Pill, but if it is you can activate the STM32 Bootloader stored in ROM and use STM32CubeProgrammer (which is brilliant by the way!) to upload new firmware over USB, eliminating the immediate need for an ST-LINK or clone.
Also, stm32duino / arduino can upload new firmware using the internal STM32 bootloader.
Heads-up: the cheap ST-LINK clones sources parasitic power to the target board which is bad for a number of reasons.
Keep up the good work!
Pieter
Thanks Pieter for the feedback and for sharing these tips!