
How to Estimate the Manufacturing Cost for a New Electronic Product (Case Study: Bluetooth Device)
Today I’m providing a step by step guide for estimating the manufacturing cost for a hypothetical tracking device that incorporates Bluetooth Low Energy (BLE), GPS, an accelerometer, and a USB rechargeable lithium battery.

When you have a new product that you want to develop, the first thing you should do is look at the big picture before you get bogged down in the details.
You don’t want to jump right into fully developing a production prototype. Product development is expensive, time-consuming, and risky so there are some upfront steps you need to take first.
Instead, first focus on what I call a preliminary production design (or sometimes just called a preliminary product design). The key is that it focuses on a manufacturable version of your product, and not just on a Proof-of-Concept (POC) prototype.
One of the most important reasons for creating a preliminary design is it allows you to accurately estimate the manufacturing cost for the product before you spend the money to fully develop it.
Part 1 – Preliminary Design
A preliminary production design focuses on answering some of the important questions that you will need to know as soon as possible. This includes questions like:
– How difficult is it going to be to develop your product?
– Is it feasible to manufacture your product?
– What is the cost to develop your product?
– What is the cost to scale from a prototype to volume manufacturing?
– How much will it cost per unit to manufacture your product?
Ultimately, one of the most important questions you want to answer is how much will it cost to manufacture your product. The manufacturing cost is going to determine how much profit you will make and how much you can sell it for.
Manufacturing cost is something you need to know as early as possible. Unfortunately, many entrepreneurs make the mistake of first fully designing their product for production. After all that’s done, they go back and start figuring out how much it’s going to cost to manufacture.
That’s not the way experienced tech companies do it. They answer all the big questions before they start sinking resources into fully developing the product.
There is no point in spending all of the time to try and develop a new product if it isn’t feasible to manufacture, or costs too much to manufacture.
A preliminary production design gives you all of the information needed to accurately estimate the manufacturing cost for a new product before the product has been fully developed. It also gives you early insight into the manufacturing feasibility of your product.
By starting with a preliminary production design it allows you to more accurately estimate all of your costs, create a more accurate timeline of milestones, and be able to better determine the manufacturing feasibility of the product. Ultimately, it allows you to develop a better product that is more likely to be successful.
System Block Diagram
The first step in developing a preliminary production design is to design the system level block diagram. Our hypothetical product includes four primary functions: Bluetooth Low-Energy microcontroller, GPS, an accelerometer, and power management.
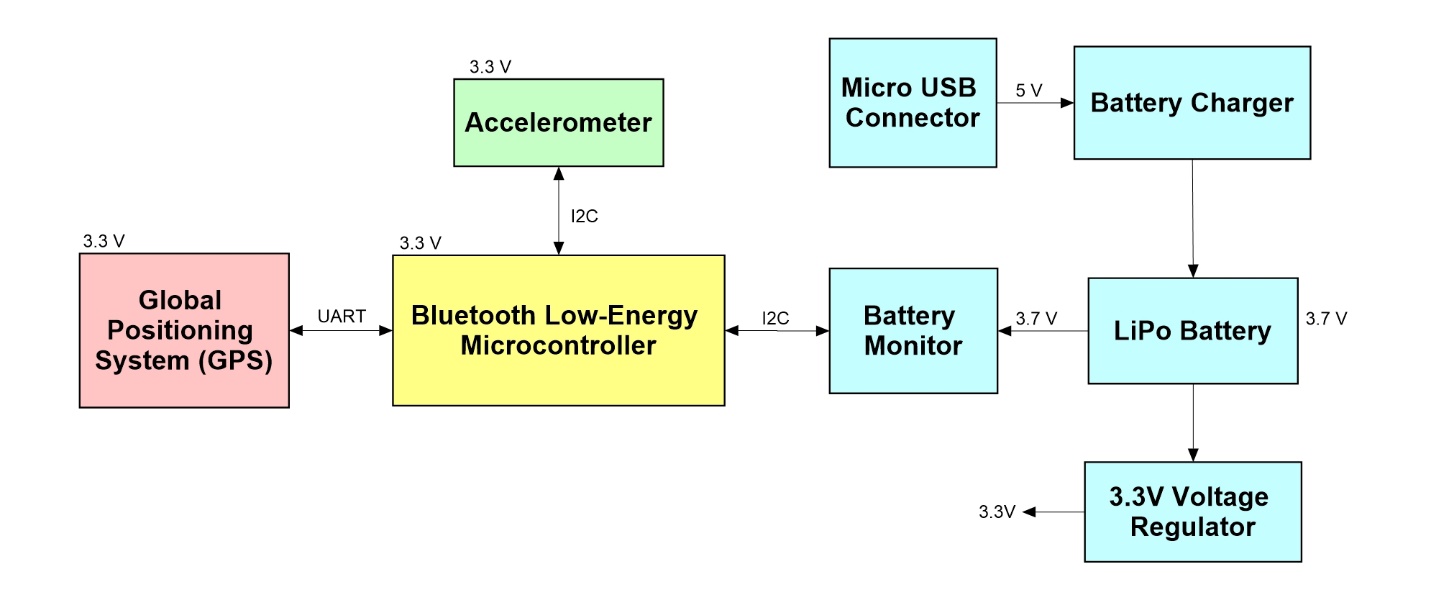
Figure 1 – System block diagram for a hypothetical BLE GPS tracking device.
Bluetooth Low-Energy (BLE) microcontroller
The core of the product will be a Bluetooth Low Energy microcontroller. This includes both the Bluetooth Low Energy radio and the microcontroller running your firmware code. Those two functions are embedded on a single chip called a System-on-a-Chip (SoC).
However, I always recommend that you start off using a pre-certified module solution, instead of a chip-based solution, for any wireless functionality, like Bluetooth Low Energy. This module will still be based on a BLE SoC but it will also include the antenna.
There are two reasons why you should start with a module. First, the use of a module drastically reduces your FCC certification cost. That can save you about $10,000 to certify your product.
The second reason is that modules will simplify the design process. Wireless functionality tends to be hard to design properly. In fact, very likely, it will require several iterations to get things just right.
Using a module reduces your time to market which is always important. Even big tech companies start off using a module so they can get their product to market faster.
If you scale up to producing 100,000 units or more, then it may be a good time to switch to a custom chip design to maximize your profit margin.
GPS
The other big piece involved with this product is GPS (Global Positioning System) which communicates with the BLE microcontroller via a UART serial interface.
As with BLE, we’re going to also use a module solution for GPS. The primary reason for using a GPS module is a bit different, however.
GPS is a receive-only technology. You’re not intentionally transmitting radio waves outside of your product. This is in contrast to Bluetooth Low Energy, where you are obviously receiving and transmitting data.
The FCC is primarily interested in the electromagnetic energy a product radiates (transmits), not what a product receives.
I still recommend using a module for GPS because it’s a very challenging technology to implement properly because you’re detecting extremely weak signals from space. In order to detect as many satellites as possible, it’s critical that a GPS design be fully optimized.
Accelerometer
The accelerometer is an electronic sensor that measures both acceleration and orientation. For example, if you stick an accelerometer to a car, it will detect when the car starts moving, stops, suddenly hits a bump, or any other movements. You can also use an accelerometer to detect orientation.
This is how a smartphone can switch between landscape and portrait displays. An accelerometer can detect orientation because it detects the direction of gravity which defines the up-down direction.
The accelerometer interfaces to the BLE microcontroller via a simple two-wire I2C serial interface.
Power Management
Now let’s look at the power section. We’re powering it off of a lithium polymer battery which outputs 3.7V. It will be recharged through a micro USB connector, which feeds into the battery charger chip. This chip takes care of all the complex stuff associated with charging a lithium battery.
Then, that lithium battery will power a voltage regulator that outputs 3.3V. This is what powers the Bluetooth Low Energy microcontroller, the accelerometer, and the GPS.
Also included in the power management section is battery monitor function to measure the charge level of the rechargeable lithium battery.
If this were an alkaline battery, you can measure its charge level pretty easily by measuring the voltage on it. For an alkaline battery this is quite simple because of the linear discharge curve. That’s not the case with lithium batteries.
A lithium battery has a very non-linear discharge curve. It remains fairly flat up to a point and then it quickly nosedives. You need to use a special chip to measure the charge level of a lithium battery.
This battery monitor chip is also commonly called a fuel gauge. Just think of the energy in your battery as the fuel for your product.
The battery monitor chip will then pass along the battery charge level through I2C to the BLE microcontroller. The battery charge state can then be transmitted to a mobile app for monitoring by the user.
Component Selection
Now that we have the system level block diagram, the next step is to select the production components that will perform each of the functions specified within the block diagram.
For each component selected, I recommend that you list the range of allowable supply voltages and the maximum current consumption. Doing so offers several benefits including:
– Quickly determine what supply voltages are required for your product.
– Easily determine the current levels each of those supplies must supply.
– Becomes more obvious if any level shifters are required.
– Allows you to make early estimates on battery life and battery size.
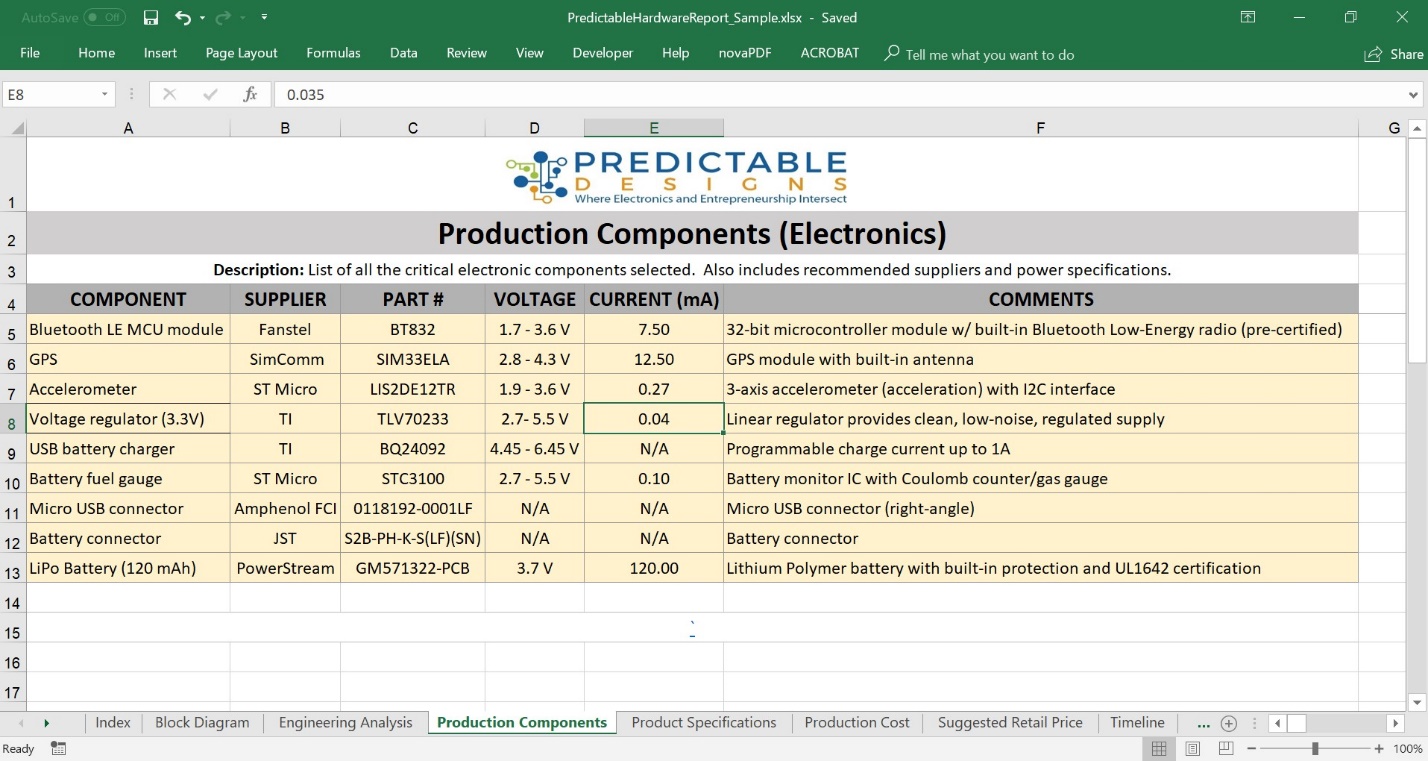
Figure 2 – List of production components selected for our hypothetical product.
Bluetooth Low-Energy (BLE) microcontroller
For the Bluetooth LE microcontroller I’ve selected the BT832 module from Fanstel. This module is based on a popular SoC from Nordic Semiconductor called the nRF52832 which embeds an ARM Cortex-M4F microcontroller running at 64 MHz.
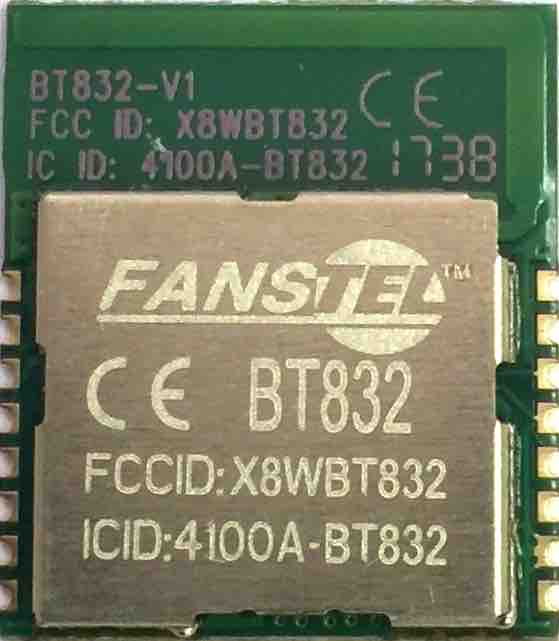
Figure 3 – The BT832 Bluetooth Low-Energy microcontroller module from Fanstel.
The BT832 includes 512KB of flash memory for program storage and 64KB of RAM. It’s programmed via a Serial-Wire-Debug (SWD) interface but also supports Over-the-Air (OTA) updates. It has a line-of-sight range of about 100 meters.
The BT832 also includes a built-in antenna. Although many wireless modules may require an external antenna (external to the module, not necessarily external to your product), I’ve never seen a BLE module without an embedded antenna.
GPS
For the GPS function I’ve selected the SIM33ELA module from Chinese manufacturer SimCom. If you are a maker you already may know this company from their SIM800 cellular module that is popular with hobbyists.
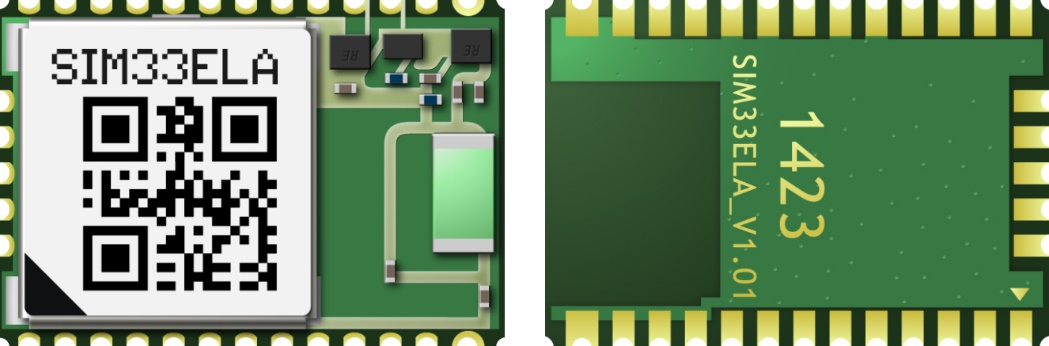
Figure 4 – The SIM33ELA GNSS/GPS module from SimCom with integrated antenna.
Although I’m calling this a GPS module for simplification, it’s technically a GNSS module. GNSS (Global Navigation Satellite System) is the broader term used for satellite navigation since GPS really only refers to the U.S. system.
A GPS module will only work with the U.S. operated satellites, whereas a GNSS module will also be able to make use of other satellite navigation systems.
Accelerometer
For the accelerometer I’ve selected the LIS2DE12TR from ST Microelectronics. This is a 3-axis accelerometer that can be used for measuring both acceleration and lateral orientation (using the direction of gravity as the reference).
The LIS2DE12TR consumes only 270uA of current and interfaces easily with a microcontroller via I2C.
Power Management
The power management section for our hypothetical tracking device consists of four key components: a battery charger chip, a fuel gauge chip, the battery itself, and a single linear voltage regulator. It also requires a microUSB connector and a JST battery connector.
For the battery charger chip I’ve selected the BQ24092 from Texas Instruments. This chip will be powered from the USB connector which provides a 5V supply. The charger can then supply up to 1A of battery charge current.
For the fuel gauge chip I’ve selected the STC3100 from ST Microelectronics which measures both battery voltage and battery current to calculate the battery charge state.
For the battery I’ve selected the GM571322-PCB from PowerStream. This battery has a capacity of 120mAh.
I’ve selected a battery that includes the protection circuitry required to prevent the battery from possibly exploding or catching fire when overcharged or short circuited. This protection circuit is embedded on a small PCB taped at the top of the battery.
The final component is the TLV70233 linear voltage regulator from Texas Instruments. This chip steps down the 3.7V battery voltage to 3.3V for powering all of the components in this design.
Next we’ll take all these components and start pricing them out to understand the full production cost for the product. But before doing that, we’re going to first look at some of the technical specifications that we can now determine.
Production Specifications
Once all of the critical components have been selected you can determine many of the key technical specifications for your product.
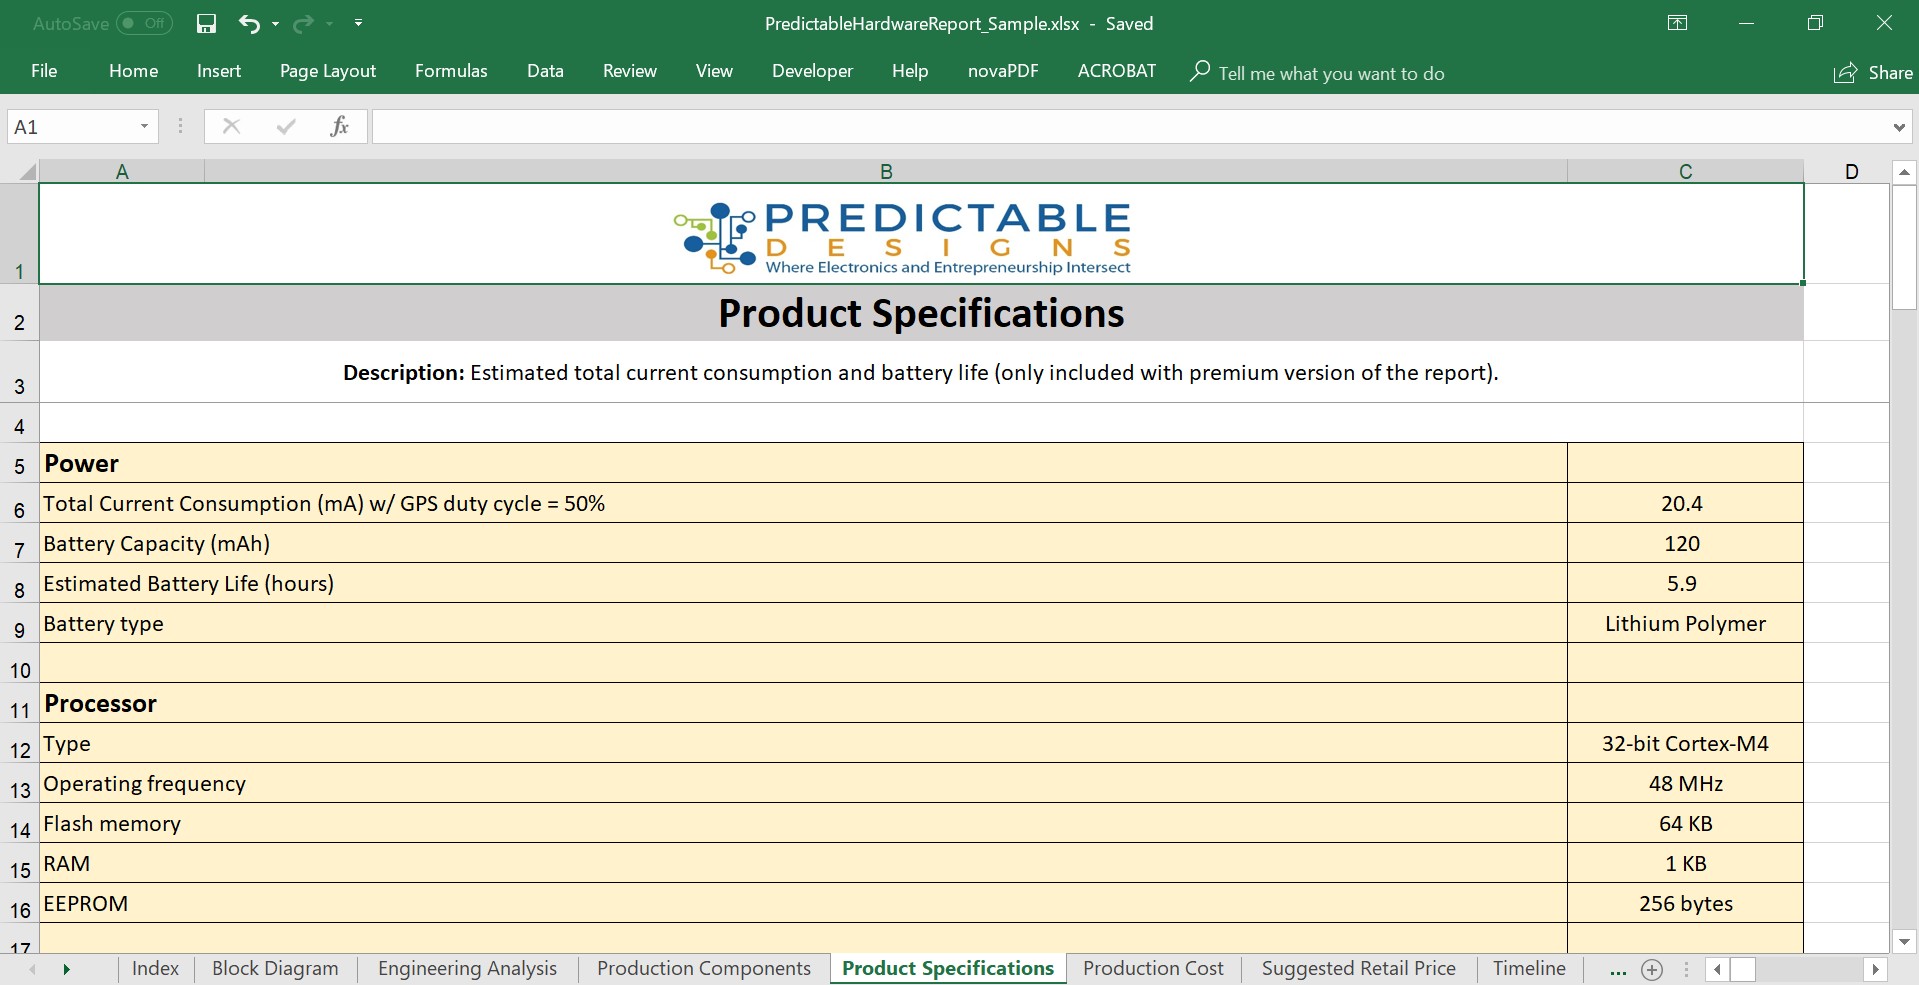
Figure 5 – Some of the key specifications that can be determined from a preliminary design.
I recommend listing them out in one place for future reference. Some of these specifications will also be needed for estimating your product’s manufacturing cost which I’ll discuss more in part two of this series.
There’s no set requirement on what you have to include in this section and it depends on your product.
Power Specifications
For a battery operated product you will definitely want to list the power specifications such as average power consumption and estimated battery life.
When specifying the average power consumption for your product make sure that you take into account the duty cycle of any high current components.
For example, the GPS module I’ve selected for this case study consumes up to 25 mA, yet I only specify the total current consumption for the product as 20mA.
This is because I’m assuming the GPS is only on half of the time. Another way of saying this is that it’s duty cycle is 50%. The GPS might be setup to turn on for two minutes, then to turn off for two minutes, and then back on again for two minutes, and so on. The SIM33ELA GNSS module specifies a time to first fix at 28 seconds so a two minute on-time should be sufficient (in the video I mention a one minute on-time but that is probably a bit too tight).
With a duty cycle of 50% the average current consumption drops in half, so I’m using only 12.5mA of average current consumption for the GPS module.
When you add the 12.5mA to the current consumed by the BLE microcontroller and accelerometer then you get the 20mA of average current I’ve specified.
I’ve selected a 120mAh battery so that gives an estimated battery life of about six hours.
PCB Specifications
It’s also important to list some of the specs for the PCB that will be necessary in order to estimate your prototyping and manufacturing costs.
This includes the number of PCB layers required (2, 4, 6, 8, etc.), the number of soldered pins, and the number of leadless packages.
Leadless packages are nice because they take up less space, but they add considerable additional cost to the PCB assembly process, and they complicate any required debugging because the pins are not easily accessible.
Enclosure Specifications
Finally, you should include the critical specs for your product’s enclosure including: the type of material, the enclosure dimensions, and the total weight.
This information is necessary in order to estimate the manufacturing cost for your enclosure.
You should also list how many injection molds are required to manufacture your enclosure. The simplest case is a two-piece enclosure with a top side and a bottom side.
Always strive to keep the number of molds as low as possible because injection molds are very expensive.
Part 2 – Estimating the Manufacturing Unit Cost
Now we’ll price out everything that goes into manufacturing the product so we can estimate the manufacturing cost for the product. We’ll also look at how to determine the suggested retail price based on the estimated manufacturing cost, and how to estimate your profit margin.
We’re now to the step that is one of the primary reasons for doing a preliminary production design.
Ultimately, I consider the production cost (also called manufacturing cost or Cost of Goods Sold – COGS) one of the most important things that you need to understand as early as possible.
This is because the manufacturing cost is what’s going to determine if your product can be manufactured and sold at a profit. It will determine how much profit you’re going to make, and how much you can sell the product for.
For example, if you’re planning on selling your product for $99 and you go through the exercise of calculating your production cost and you find out it will cost you $75 to manufacture, then something’s going to have to change. You’re going to need to find ways to lower the cost or increase your suggested retail price.
Or you may determine that the product isn’t worth pursuing if it’s not going to ever make a sufficient profit. But, that’s okay too. If that is the case you need to know as soon as absolutely possible so you can pivot to a new product with higher profit potential.
Manufacturing Cost Breakdown
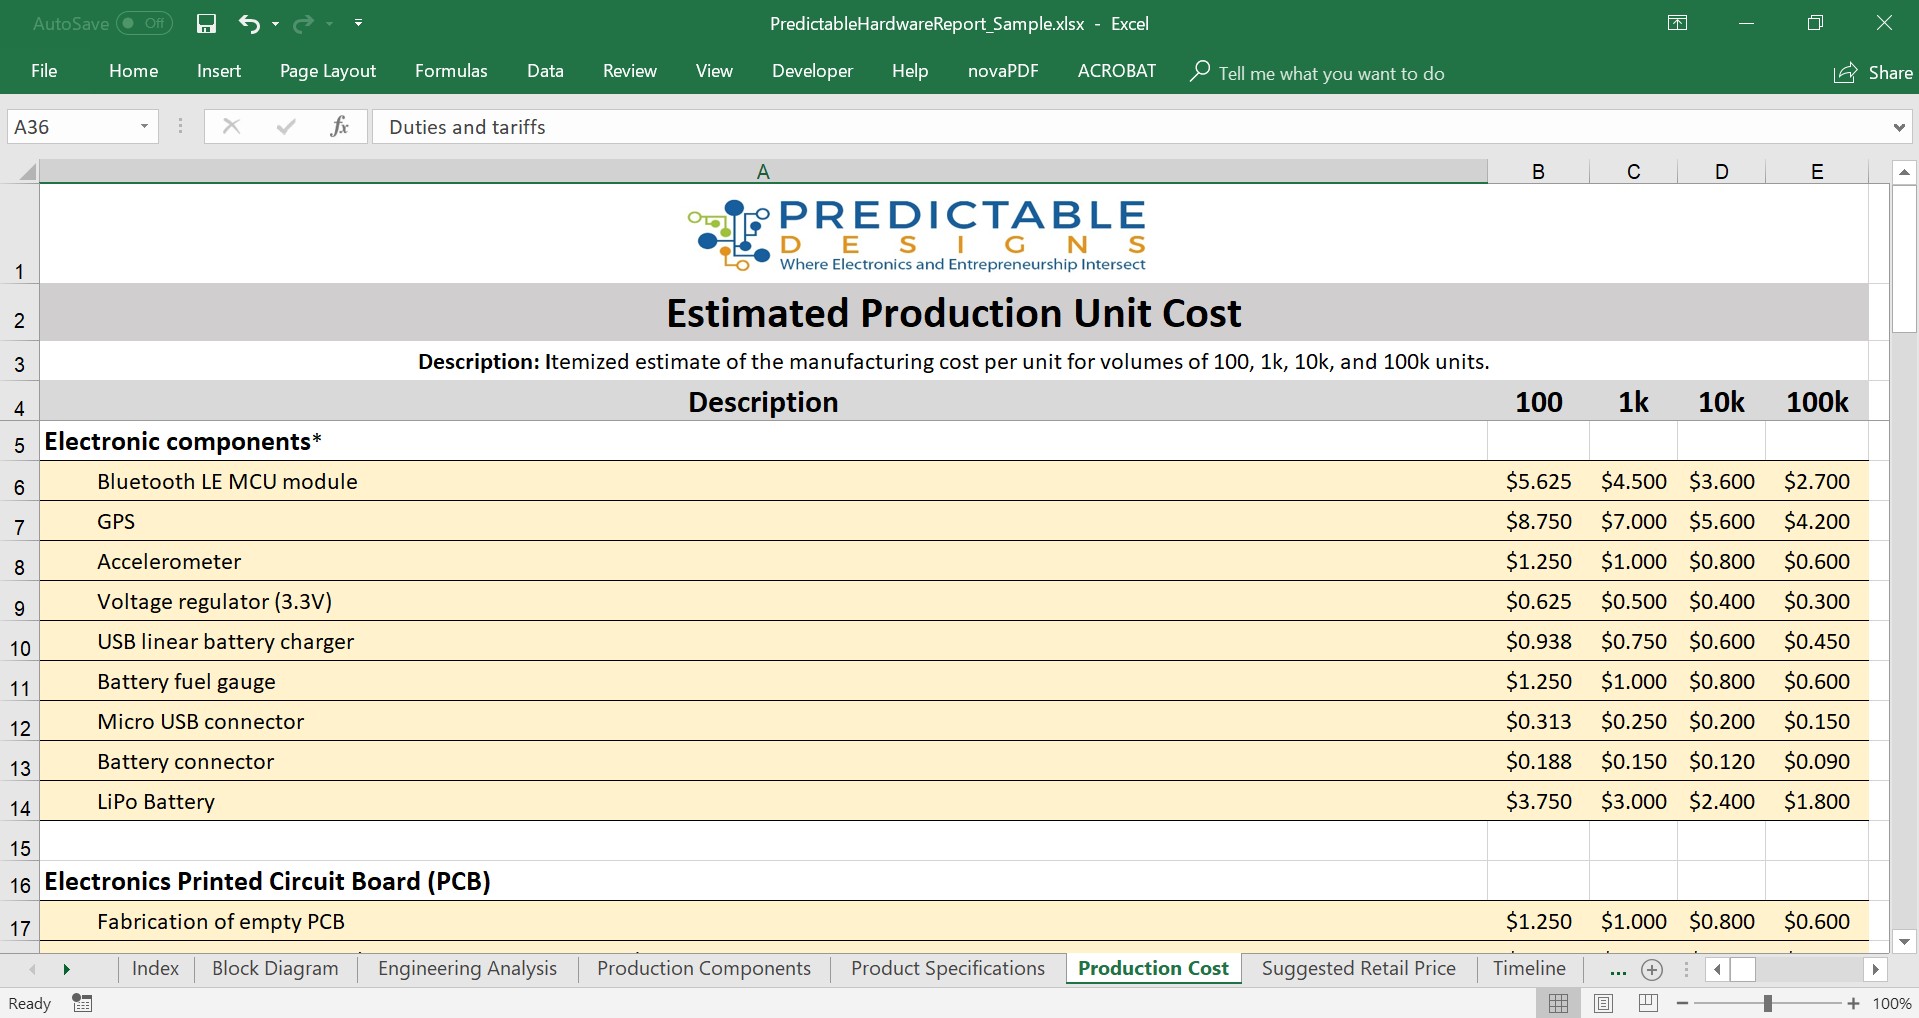
Figure 6 – The electronic components costs.
We’re now going to run through all the different pieces that make up the total production cost. I’m specifying the costs for volumes of 100, 1k, 10k and 100k units.
In general, for 100 and 1K units, domestic manufacturing is preferred. Then, for volumes of 10k or greater, manufacturing in China is usually the way to go.
Keep in mind that even with low volume production, you’re still better off sourcing any components that you can through Asia. Then assemble the product and do all your testing domestically.
This hybrid manufacturing strategy allows you more direct control over the assembly process, final testing, and ultimately the quality of the final product. Yet, it still provides significant cost reductions by buying components from China.
Electronic Component Costs
I’ve started off by listing all the electronic components that we’ve already selected in part one of this series, including the Bluetooth microcontroller module, the GPS, accelerometer, connectors, the battery.
Then, I specify their prices for 100, 1k, 10k and 100k units. These volumes are assuming the product is expected to be a high-volume consumer electronic product. For high-dollar niche products lower volumes are likely more appropriate.
As you increase your manufacturing volume you will get discounts for purchasing the components in higher quantities. The best way to determine your quantity discounts is by getting quotes from the suppliers.
However, if you’re just looking for a ballpark estimate, you can roughly assume that each time you jump up by a factor of 10X you’re going to get between a 10% and 25% discount.
Once you get into really high volumes of 100k units or more, you have more pricing flexibility because at those levels you can negotiate pricing with your suppliers.
Printed Circuit Board
After listing the costs for all of the various components the next cost is the fabrication of the empty Printed Circuit Board (PCB). The two main criteria that impact the empty PCB cost are the number of layers and the size of the board.
After the empty PCB is produced, the next cost is the to solder on all of the electronic components. This step is called PCB assembly.
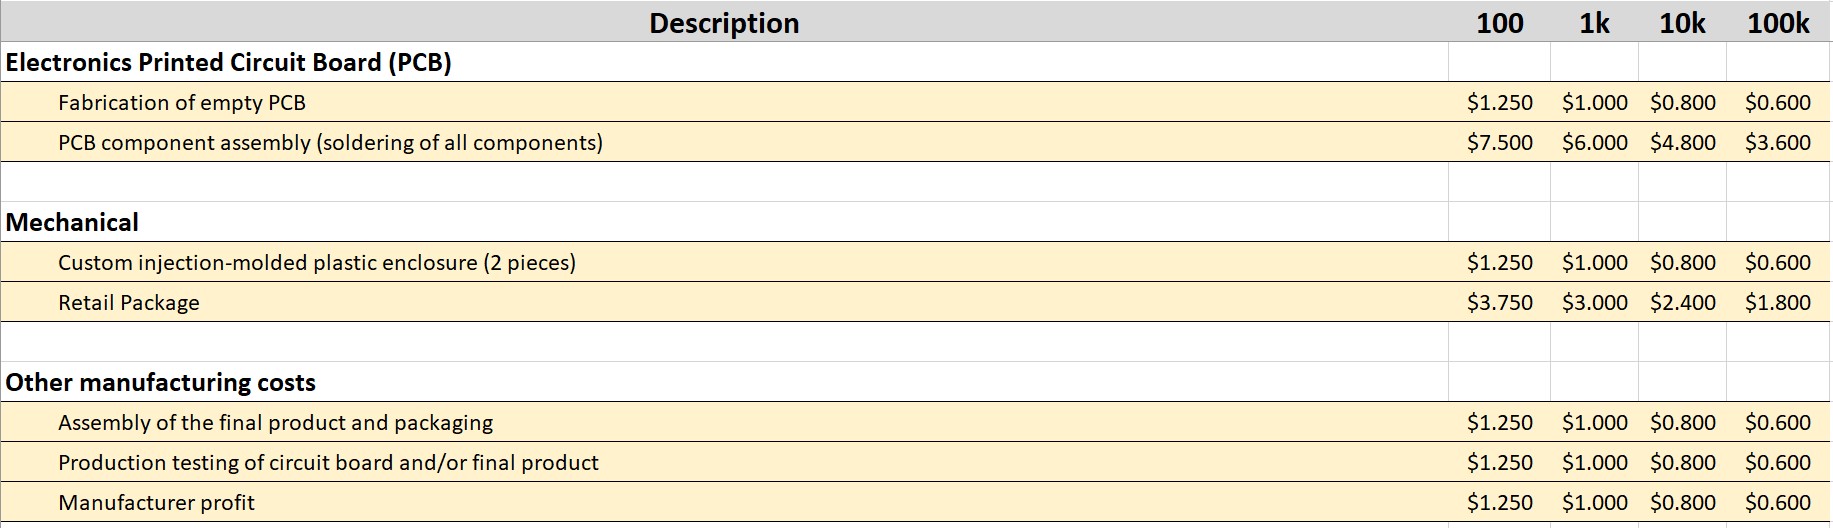
Figure 7 – Manufacturing cost estimates for the PCB, mechanical, and other steps.
PCB assembly costs are mostly impacted by the total number of component pins to be soldered and the number of leadless or fine-pitch components. PCB assembly will usually be cheaper if you stick entirely to using surface-mount components and avoid mixing in any through-hole components.
You will learn that the cost to assemble the PCB is going to be a lot higher than the cost to fabricate the empty PCB. As a rough estimate about 25-35% of your PCB cost will be for the empty board, with the remaining cost being for the PCB assembly. Of course, this is in addition to the cost of the actual components themselves.
If you go to the website of many PCB prototype shops, like Sunstone Circuits, Seeed Studio or Gold Phoenix, you will find that they have calculators you can use to estimate the cost of your PCB.
Mechanical Costs
For most products, including our BLE tracking product example, the mechanical costs will primarily be for a plastic enclosure. In this example design I’m assuming the simplest possible enclosure which is comprised of just two pieces of plastic that form the top side and bottom side.
The main drivers on the cost for your enclosure are going to be the dimensions of the part that you’re making, what type of plastic you choose, how much plastic each part requires, and the number cavities in your injection mold.
You’ll want to always start with a single cavity mold which means it can produce only one part at a time.
As you increase your manufacturing quantity then you will want to transition to multi-cavity molds which can produce multiple copies of the same part with each injection. Multi-cavity molds significantly decrease the manufacturing cost for custom plastic parts.
Packaging
Don’t forget to take into account the retail package you will need. A lot of people forget this step when they’re trying to figure out the approximate cost of their product.
With sales through your website or Amazon, the package mainly needs to protect the product. Since you are selling directly to the consumer through a website, it’s not as critical to have the absolute best packaging possible. In that situation the website is what sells the product, not the product package.
That being said, you don’t want people to get your product in the mail and immediately have a bad impression because the packaging looks boring or cheap.
Packaging becomes much more critical (and expensive) in a retail environment, where people don’t have a website and a description of your product to look at. They just have your packaging to help them decide to buy.
You will definitely need to put a lot more thought into the appearance and message of your packaging when you’re selling in retail. Be aware that really fancy full-color retail packaging (especially retail boxes) is going to be expensive so you absolutely need to account for that cost in your manufacturing cost estimate.
Final Product Assembly
Next, we need to add in the cost to assemble the final product. Don’t confuse this step with the PCB assembly. The PCB assembly step is only to solder on all of the electronic components on to your circuit board.
On the other hand, final product assembly is the cost to fully assemble your finished product which includes packaging the product.
The assembly cost mostly involves the cost of labor, since you have factory workers putting your product together. Fully automatic robotic assembly only begins to make financial sense for very high manufacturing volumes (millions of units).
The best method to estimate your final assembly cost is by timing how long it will take to fully assemble your product. Then, based on the average hourly rate for factory workers where you manufacturer is located, you can accurately estimate your final product assembly cost.
The more you can do to simplify your product assembly process, the more money you’re going to save on assembly. So optimizing your assembly process should always be a priority.
Quality Testing, Defects, and Returns
The next set of costs involves testing your product and accounting for any defective and returned units.
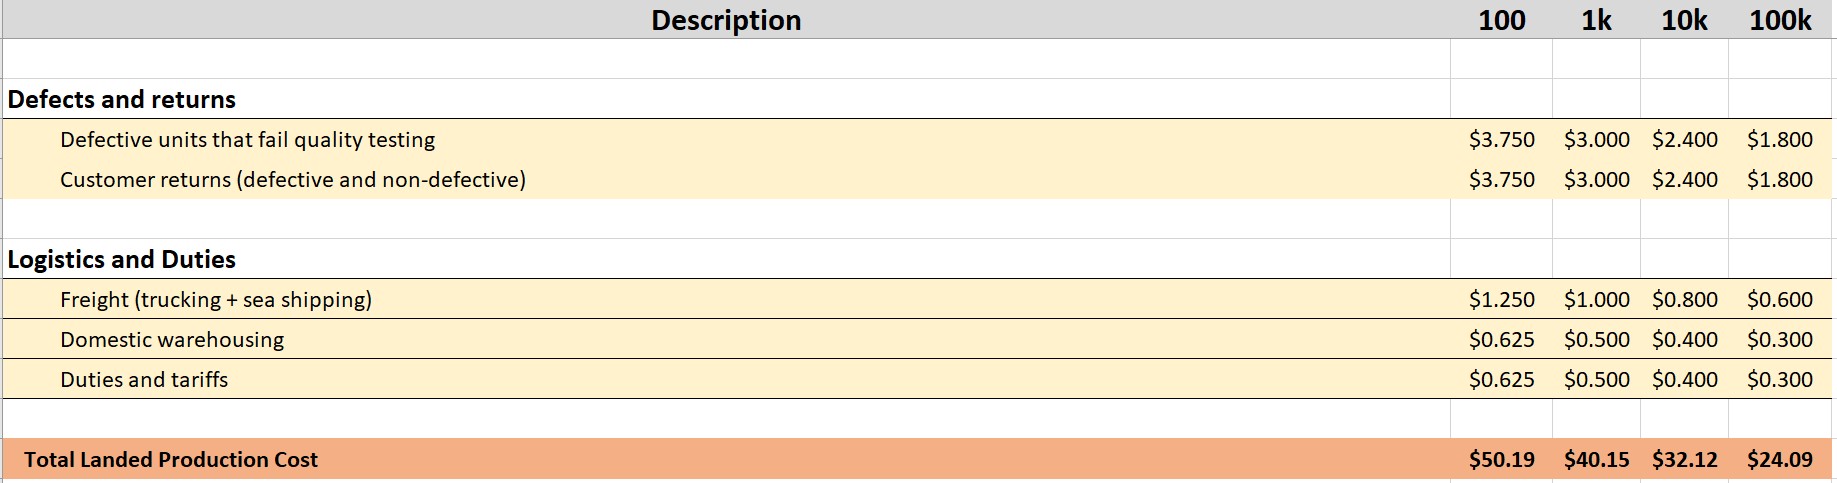
Figure 8 – Estimates for defects, returns, logistics, and import duties.
You obviously don’t want to just assemble your product and sell it without testing it beforehand. There are various ways to do this. You can choose to assemble the full product and then test it. Or you can choose to test pieces of the product individually before you put them together.
Any units that fail testing will need to be marked as defective and scrapped or recycled. Early on assume a defective scrap rate of 10%. As your manufacturing process continues to ramp up this scrap rate will become lower. Eventually, you will should aim for around a 1-2% defective rate.
You also need to factor in customer returns of your product. Regardless of how great a product is, there will always be customer returns. Some returns will happen because of product defects, and others for any number of reasons.
As with the defective rate, the customer return rate can usually be assumed to be around 10% initially. As you improve your product quality and customer support the return rate will also decrease over time.
Shipping, Warehousing, and Duties
If your product is manufactured in China, it will need to be trucked from the factory to the boat dock for shipping by sea cargo.
Then, it will take about three weeks to cross the Pacific Ocean, where it will most likely land at a port in California. Shipping by air is much more expensive so should only be used when absolutely necessary.
You will also have additional domestic trucking expenses depending on where your warehouse is located.
If your port of entry and your warehouse are in Los Angeles, for example, then the trucking cost to get your product from the port to your warehouse is going to be very minimal.
If you’re warehousing the product instead in Boston, then you’re going to have to truck the product all the way across the country, adding extra trucking costs.
Make sure to also include the cost of warehousing your product. Most of the time you’re going to have an order shipped to your warehouse. Then you will sell and ship multiple smaller orders from your warehouse inventory.
However, you can eliminate warehousing costs entirely if you obtain a large enough order to have the product shipped directly from the port to the retailer. If you have a customer that wants to purchase say 10,000 units, then there’s no point in shipping the product to your factory or warehouse.
Most of the time however, and especially when you’re just starting out, you’re going warehouse or store the product yourself.
Also factor in any duties and tariffs for importing your product. Consumer electronic products under $250 currently have no U.S import duty. However, there may be tariffs in place so be sure to confirm the current requirements.
Total Landed Manufacturing Cost
The final step is to now add up all these individual costs to determine your total landed cost. Landed means after it has arrived in your warehouse. This has to include all of the costs to get the product manufactured, shipped from China, and transported to your warehouse.
Here is an in-depth course where I show you exactly how to estimate the manufacturing cost for your product before you even develop it.
Your total landed production cost is what you’ll use to figure out your profit margins and the retail price for your product. That’s what we’ll be discussing next.
Suggested Retail Price
Now that we have calculated the landed manufacturing cost, we can make realistic estimates on what the suggested retail price should be.
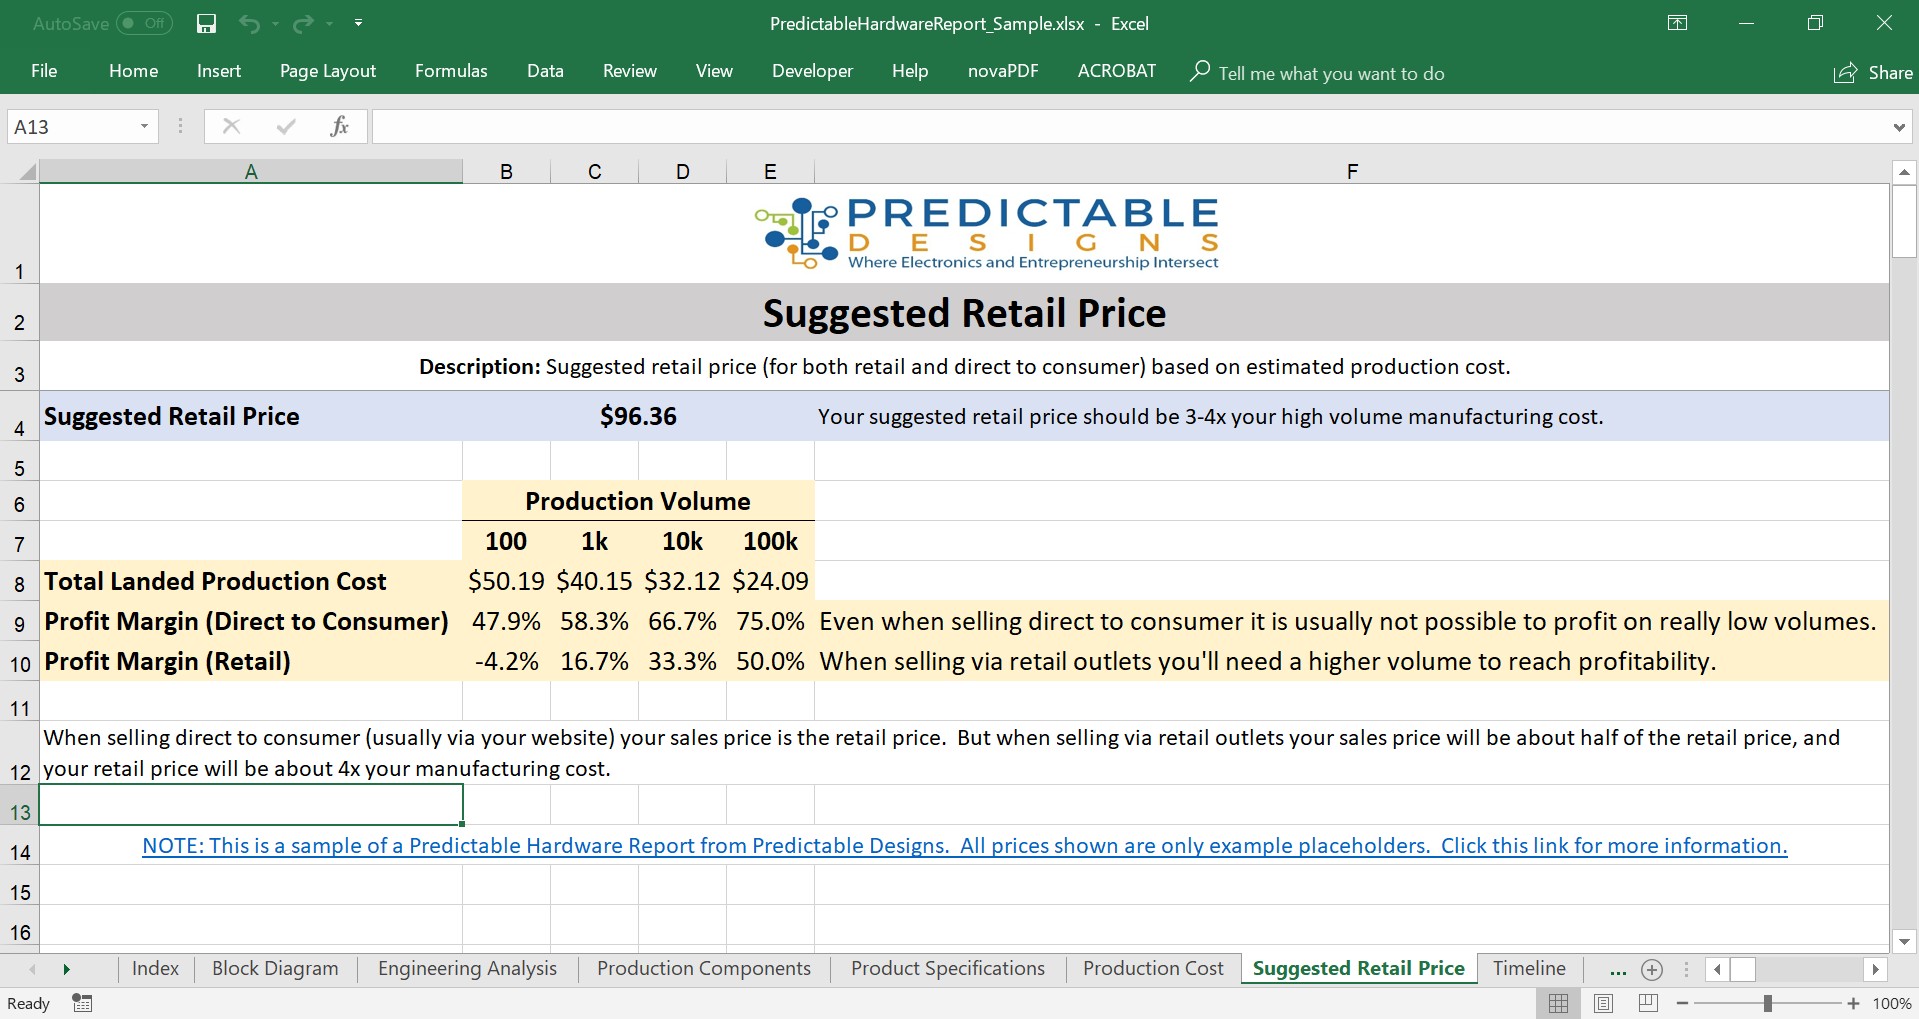
Figure 9 – Estimates for the suggested retail price.
You first need to know there are two general ways to sell a new product. One way is to sell it through your website directly to the consumer. You would buy the product from the manufacturer and sell it directly to the consumer.
The other way is to sell your product through retail stores. The main difference between the two is that your profit margin will be a lot higher if you sell directly to the consumer because a third party (the retailer) isn’t taking a cut.
For instance, if you sell your product through Walmart, they will take a significant percentage of the sales price.
The standard markup when selling through retail channels is to set your suggested retail price at four times your landed manufacturing cost. This means you sell the product to the retailer at double your manufacturing cost, and then the retailer sells it to consumers at double what they pay (wholesale cost).
If you’re going to sell directly to the consumer, then your total markup can be lower. I would shoot for three to four times your manufacturing costs.
Keep in mind that although you can technically sell your product at a lower price when selling via your website, this strategy can have some negative consequences once you begin also selling in retail.
Retailers won’t want to sell a product in their stores that can be purchased directly from your website at a much lower cost. You are essentially undercutting your retailers, and that is generally not acceptable.
Even though you can afford to use only a 2x markup when selling direct to consumers, that probably isn’t a good idea.
The manufacturing cost varies drastically depending on the volume of parts. You’re going to be competing with other companies that are obviously already running high volume on their product.
To be able to compete, you’ll need to base the price of your product on your high volume landed production cost.
In my example, I’m using the price at 100K units to set the retail price. The total landed cost for the hypothetical BLE GPS tracking device was $24.09 at 100k units.
If we use a 3-4x markup then that gives a suggested retail price range of $72.27 to $96.36.
For more details about setting your product’s suggested retail price be sure to read my definitive guide to pricing your new electronic hardware product.
Profit Margins
Once you know the suggested retail price and manufacturing costs, you can now estimate your profit margins for selling direct to consumers and through retail channels.
A retail price that is four times the manufacturing cost will typically give you a 50% profit margin when selling retail. That’s because each person in the distribution chain commonly doubles the price that they pay for a product (called keystone pricing). For a hardware product, aim for a 40% to 60% margin, with 50% being the standard.
You should expect to sell your initial hundred units or more at a loss. But profit isn’t your priority at these low levels. Getting orders and feedback are the top priorities at the beginning. Profit comes later.
Once you reach around a thousand units, your margins will increase but still be very minimal. At these small volumes, you’re going to have to take a margin hit at least until you are able to get your volume ramped up.
You have a lot more flexibility on your pricing if you start off selling directly to the consumer. That is one of the main advantages to selling direct to a consumer.
Selling direct to consumers also allows you to get more direct feedback from the consumer. If you sell your product through Walmart, you’re not going to ever hear what the end user thinks of your product.
Instead, you’ll hear what Walmart thinks of your product and how it sells, but you won’t get the direct feedback that allows you to improve the product or improve your marketing message.
Another nice thing about selling direct to the consumer through your website is you don’t have to have to spend as much time on your packaging. It also reduces your cost because packaging can be rather expensive.
In most cases I recommend that you start by selling directly to the consumer. Get some initial sales under your belt, and use that success to start selling your product through retailers.
Conclusion
We have designed the system block diagram, selected all of the critical components, and listed the key technical specifications for our hypothetical BLE tracking device.
Then, we priced out everything that goes into manufacturing the product to estimate the manufacturing cost for the product. We also looked at how to determine the suggested retail price based on the estimated manufacturing cost, and how to calculate your profit margin.

As always great article John, I have a few doubts if you could help
Thank you for the great feedback!
1) Certifications are for the entire product, not for individual boards.
2) Manufacturers always charge for molds which start at about $2k for low volume simple ones, up to tens of thousands for each at high volume. The bigger the product of and the more custom pieces required will increase your mold costs.
See these articles for more details:
https://predictabledesigns.com/the-cost-to-develop-scale-and-manufacture-a-new-electronic-hardware-product/
https://predictabledesigns.com/introduction-to-injection-molding/
Thank you John for taking time to respond. Much appreciated.
For 1. seems like we do not option but to go for certification because we have many components that we could use off the shelf module but one of the sensor need is custom made. And since one have to go for certification anyway, should one still use off the shelf modules that are already certified or would be better to fabricate their own? Or its advisable to still use off the shelf components? Is there anything one need to be careful about during design & development phase so that the product is passed through the certification without hassle?
For any wireless functions you should still definitely use pre-certified modules to lower your certs cost. Doing so likely means you would only need non-intentional radiator FCC cert which is cheaper.
Other complex functions should use modules just to reduce potential design issues.
I have a very in-depth course on certifications inside my Hardware Academy which covers all of this in great detail. This course alone is worth the cost to join.
Hi John,
Realy nice article. If it is not a secret, I would like to ask you which software did you use to draw the block diagrams?
Best wishes,
Matjaz
Thank you Matjaz! I used ClickCharts for the block diagrams. Cheers, John
Dear John
Thanks again for a great article! I always read them. Usually I archive valuable articles in PDF form for future use. Earlier you included a “button” for downloading your article in PDF form. That was very helpful, since web browsers (all of mine, Firefox, Chrome and Edge) seem to have troubles converting web pages into PDF. Often I need to go via copy-paste to Word, then printing into PDF. But even then, figures and tables typically require tweaking to get them fit.
I do not know if it was tedious for you to publish your article in PDF as an option, but wish you could continue doing it.
Thank you so much!
Tom
Thanks for the feedback Tom. Yeah it was a bit tedious so I stopped including them but I will definitely consider adding them back.
Cheers,
John
HI John,
That is a very excellent piece of research,
I just need one your excel sheet in my assignment and need some of your article citation.
hey i was wondering if i can find that powerpoint with all the prices that is shown in the pictures anywhere
Hi Josh,
I assume you mean the Excel spreadsheet with all of the prices. Yes, I have something similar available for download in my Hardware Academy membership. There is actually a full course in there where I show you how to estimate the manufacturing cost for your product, and I have the spreadsheet as one of the available course downloads.
Cheers,
John
Hi John,
I cant find your section of timeline of the product development in the content. Where can i find it.
Here you go: https://predictabledesigns.com/product-development-timeline-how-long-it-takes-to-develop-a-new-hardware-product/
Thank you John! I really appreciate the way you put things in order. I am so sorry my comment will be off topic. But I was wondering if it is possible to go deep about the design of mixed signal circuits; the issue of the star point about ground connection VS some suggested shorting the analogue and digital grounds via a 0 Ohm resistor. Again the importance of having signal layers (like 3.3V or 5V).
Thanks!!
Can you point me to one of your blogs that deal with NRE costs and vendors that provide assistance with industrial design, mold tooling, package design, and quality control (ISO9001 certification)? I have found that up front non-recoverable engineering costs can put companies in a big hole that future revenues must lift them out of. Just to give myself a big picture, I like to multiply the production volume by the profit per unit to get an idea if the NRE costs are in line with the expected annual profits if ROI is one year. Do you have a feel for how many IOT products actually make it to 10k units sold/year ? In your “practice” example, that 10k is where real profit can be made on one device. Thank you for your educational efforts, they are appreciated.
Hi Rick,
Thanks for the comment and questions. Yes, NRE costs are especially significant for hardware products. I recommend reading this article for more details on all of the required upfront engineering costs: https://predictabledesigns.com/the-cost-to-develop-scale-and-manufacture-a-new-electronic-hardware-product/
Unfortunately I don’t have any data regarding how many IoT products make it to 10k units. I’m sure it’s a relatively low percentage per I’m not sure of the exact percentage.
Thanks again!
Dear John Teel
Your articles are very interesting. But reading your tutorial about “Case Study: Preliminary Design for a Bluetooth Low-Energy GPS Tracking Device Part-2. The prices for assembly is higher than your Estimated Production Unit Cost. The PCBGoGo charging $584.00 for assembly and the BOM of Main Board 1.3054.00. have another company that charging less without Seeds because they want Excel files_BOM. Can you help me, please?
Hi Jose,
I’m not entirely sure I understand. All of the prices in my sample report are just examples. The prices you are listing sound like prototype costs for a low number of boards. That is considered a development expense. The manufacturing cost at volume is much lower.
Thanks for the comment.
Love it! The two parts you’ve written so far are really good for entrepreneurs. Will definitely send people here when they want to get an idea of the process they’re about to embark on.
Best,
Oyvind
Awesome, thanks Oyvind!
John, Thank-You ! This was so imformative. Everything you have covered was vital to any start-up. Right now I am exploring the certification proceses needed in the states. If things do well here I can always consider foreign markets. My Item of interest operates soley on low DC voltages so I have been told that UL may not be required… but don’ larger retail stores want it anyway? also is there a list of components or circuits that constitute unintentional radiators ? Surely a mosfet switching an Led at 4 hz can”t be a cause of noise ??? Does each of these certification agencies offer guidelines? any suggestions for selected reading
would be appreciated
Hi Dave,
You are most welcome, and thank you for the positive feedback!
I agree that you technically shouldn’t need UL certification. But, yes you are correct that some big retails may want it regardless just to be safe. Anything that operates above 9kHz requires non-intentional FCC certification. So long as you have nothing operating at 9Khz or high you should be fine.
Thanks John, I’m that much closer now !
Always happy to help.